The electrode sticks when you strike: seven causes and the cure
An electrode freezes into the joint when the arc cannot deliver enough energy to keep the tip molten. There are seven causes for that, and they are worth checking in order of how often they are the cause.
Short answer
An electrode most often sticks for three reasons: too little current, too short an arc, and damp coating. Add 10–15 A, strike it like a match, and hold an arc about one electrode diameter long. If a fresh rod from an opened packet sticks, that is moisture and not the settings.

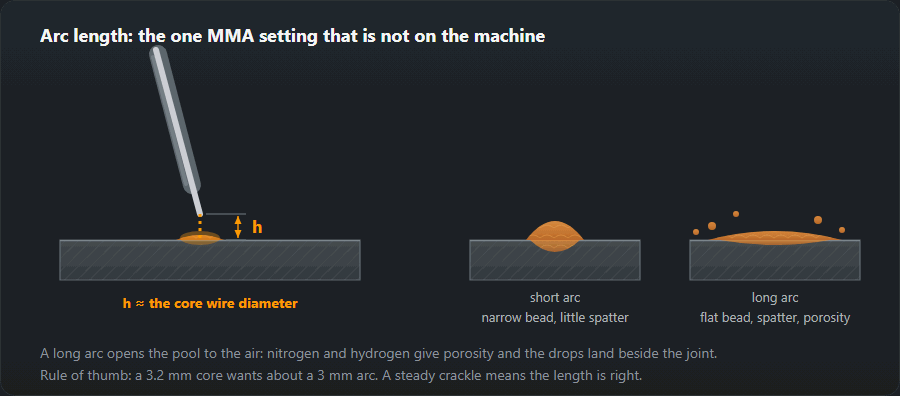
If more current and a longer arc do not cure it, check the earth clamp — after a few welds it should not be warm. The full order of checks is in the table below.
The order to check in
| # | Cause | How to check in a minute | What to do |
|---|---|---|---|
| 1 | Current too low | Compare with the range for your diameter | Add 10–15 A, check it in the current calculator |
| 2 | Arc too short | The gap should be about one electrode diameter | Hold a longer arc, stop pushing the electrode into the plate |
| 3 | Poor earth contact | Touch the clamp after a few welds — is it warm? | Grind the contact spot to bare metal, move it closer to the weld |
| 4 | Damp coating | Was the packet left open? Does the rod crackle and spit? | Dry it as the packet says, see coating types |
| 5 | Voltage drop in the cable | Cable length and section, connectors heating up | Check the section in the cable calculator, uncoil the loop |
| 6 | Basic electrodes on AC | Marking on the packet: B, "DC+ only" | Switch to DC+ (electrode positive) or change the electrode |
| 7 | Mains voltage sag | Lights flicker, the machine sags under load | Check the supply lead and the breaker, drop the thin extension |
Current too low
The commonest reason by a wide margin. Below roughly 30 A per millimetre of core diameter the arc will not sustain itself: the tip touches, cools, and welds itself to the plate.
Add 10 A and try again. If the arc settles and the bead flattens out, that was it. The starting figure for your diameter, position and coating comes from the current calculator.
A poor return connection
The clamp on painted, rusty, galvanised or oily steel makes a resistive contact, and the voltage disappears there instead of at the arc. Symptom: the machine reads the right current but the arc feels weak, and the clamp is warm after ten minutes.
Grind a patch of bare metal for the clamp, and clamp onto the workpiece itself rather than onto a bench that is only touching it. A clamp on a bench that happens to be under the job is a connection through two more contact resistances.
Cable too thin or too long
A long, undersized lead drops the voltage before it reaches the arc. Thirty metres of 25 mm² at 200 A loses several volts, and a stick arc has only about 25 to spare. The symptom is unmistakable: the machine welds fine on the bench and sticks at the far end of the extension.
Step-by-step diagnosis, simplest first
The order is set so the first steps take seconds and need no tools. Change one thing at a time, or you will never know what fixed it.
- Where it sticks. Only on the strike — see striking the arc below. All along the weld — current, arc length or the return.
- Current against the range. A 3.2 mm rutile rod in the flat runs at 90–140 A, middle about 115 A; a 2.5 mm rod at 70–100 A. Below the bottom of the range — go to the middle; already in the middle — add 10–15 A.
- A test bead. Run a bead on scrap in the flat with the same cable and the same return. If it sticks there too, look at the machine, the leads or the rods. If it does not, the problem is the weld position or where the return clamp sits on the job.
- The return clamp. On ground bright metal of the part itself, not on the bench it sits on. Touch it after two or three rods: a warm clamp means voltage is being lost in the contact.
- Leads and extensions. If it welds on the bench but sticks at the end of a long run, the voltage is lost on the way. Check the section for your current and length in the cable calculator.
- A rod from a sealed packet. The new one burns smoothly while the old one crackles and sticks — the old packet needs drying.
- Polarity. Basic rods on AC or on DC− stick constantly; they want DC+ (electrode positive).
Striking the arc without sticking

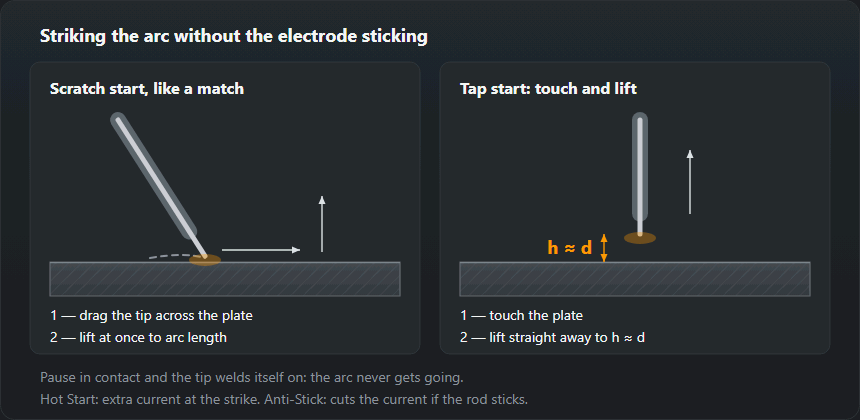
The scratch start is easier for a beginner: the tip is dragged across the metal like a match on the box and lifted to arc length at the end of the stroke. The rod never stops moving, so it has no chance to freeze. The tap start is for places with no room to scratch: in a corner, by an edge, on a finished face. Touch and lift at once — a fraction of a second of dwell is exactly what welds the tip on, and it is what a beginner does while waiting to see whether the arc has started.
- Restriking a used rod. When the arc breaks, a cup of coating and slag is left on the tip and insulates the core. Knock it off with a light tap on the metal or clean the end, or the arc will not light at the first touch.
- Where to strike. On the groove face or where the weld will go, not on the plate beside it: arc strikes on the parent metal count as a defect. Basic rods are best struck a little ahead of the start and brought back into the crater so the first drops are remelted.
- The first second. Right after the strike the arc is held a little long so the tip warms up, then shortened to working length — about the electrode diameter.
Damp rods: how to tell and how to dry them
A damp coating gives itself away at once: the rod crackles and spits, the arc is ragged, the weld is porous, and a warmed coating can sometimes be seen steaming. The honest test is to compare with a rod from an unopened packet at the same settings.
Drying by coating type:
- Basic (OK 48.00, E7018) — 300–350 °C, 2 hours; then a quiver at 100–150 °C.
- Rutile (OK 46.00, E6013) — 70–120 °C, 1–2 hours; a sealed packet in a dry place is usually enough.
- Acid — 100–150 °C, about an hour.
- Cellulosic (E6010) — do not bake: no more than 70–80 °C, the moisture in the coating is part of how the rod works.
Figures printed on the packet beat these. More on storage and markings under electrode coating types.
Hot Start, Arc Force and Anti-Stick: what to set on an inverter
- Hot Start raises the current briefly at the moment of the strike. It helps when only the first touch of a cold rod sticks, especially with basic rods.
- Arc Force adds current when the arc shortens and the voltage drops, so the drop cannot freeze the rod to the plate. Useful on verticals and overhead; too much of it means extra spatter.
- Anti-Stick drops the current if the rod does stick, so the core does not glow and shed its coating. It does not remove the cause — it only saves the rod.
If there are no knobs for them, these functions usually work automatically. What is left then is the current from the current and diameter table and the arc length.
Frequently asked questions
It stuck. How do I get it off without ruining the electrode?
Twist it sharply sideways — do not pull. If it will not come, release it from the holder, let it cool and break it off; the coating at the tip is finished either way and the stub needs a fresh strike. Yanking on the holder is how leads get damaged.
Only the first strike of each electrode sticks.
That is normal on basic electrodes, whose coating insulates the very tip. Scratch the tip on the plate to expose the core, or break the coating edge on a hard surface. Some welders keep a file at the bench for exactly this.
Everything is set right and it still sticks.
Then look at the circuit rather than the settings: the return clamp on paint or rust, a corroded connector, a coiled extension lead, or a cable too thin for the current. Voltage lost in the circuit never reaches the arc — the cable calculator shows how much.
Why does the rod stick with an inverter welder?
An inverter holds its current accurately, so the cause is usually outside it: the current is set below the range for the diameter, the arc is held too short, or the voltage sags in a thin extension lead. For a 3.2 mm rod in the flat the range is 90–140 A; if the dial is below 90, start there.
How do I dry electrodes that have got damp?
Basic rods: 300–350 °C for 2 hours, then keep them in a quiver at 100–150 °C. Rutile: 70–120 °C for 1–2 hours. Cellulosic rods must not be baked — no more than 70–80 °C. If the packet gives its own figures, they override the table.
It is fine in the flat but sticks on a vertical. Why?
On a vertical the current is cut by about 15 %, and the hand tends to feed the rod into the pool, shortening the arc. For a 3.2 mm rutile rod stay at 75–120 A with an arc about one diameter long, and if the set has Arc Force, turn it up: it adds current as the arc shortens.
Updated: