How to become a welder
The route from never having struck an arc to holding a qualification somebody will pay for. It is shorter than most trades and longer than the course brochures suggest.
Start with one process
MMA or MAG. MMA teaches you to read the pool, because everything happens slowly and visibly, and the equipment is simple enough that nothing hides behind a setting. MAG is what most fabrication shops actually run, so it gets you employed sooner.
Either is a defensible first choice. What is not defensible is trying to learn three at once: the muscle memory is different for each, and splitting the practice means none of them become automatic. Add TIG later, when the first process is boring.
135, 111 or 141: where the jobs are
A structural steel shop wants 135 on plate in PB and PF. Site erection wants 111 plus 135 in PF and PE — you cannot always get a gas bottle to where the steel is. Pipework and plant installations mean 141 on pipe in H-L045, and stainless for the food industry means 141 in material group 8.1.
From zero, 135 is the default: the most vacancies and the shortest road to a first pay packet; 111 if you aim at erection. 141 is the second step — pay rises in the order 111, 135, 141, pipe, but every step is another test.
| Step | What it takes | How long |
|---|---|---|
| 1. The medical | Eyesight and general fitness; a referral from the employer or privately | One day |
| 2. Choosing the process | MMA is cheaper, MAG is faster to a job, TIG takes longer and costs more | — |
| 3. The course with the test | An accredited centre and hours at the bench | 1–3 weeks |
| 4. The test and the book | A test piece, examination, an EN ISO 9606-1 certificate | One day |
| 5. The first job | The qualification and a willingness to take simple work | — |
| 6. Keeping it valid | The supervisor’s confirmation entered in the book | Every 6 months |
The practice nobody budgets for
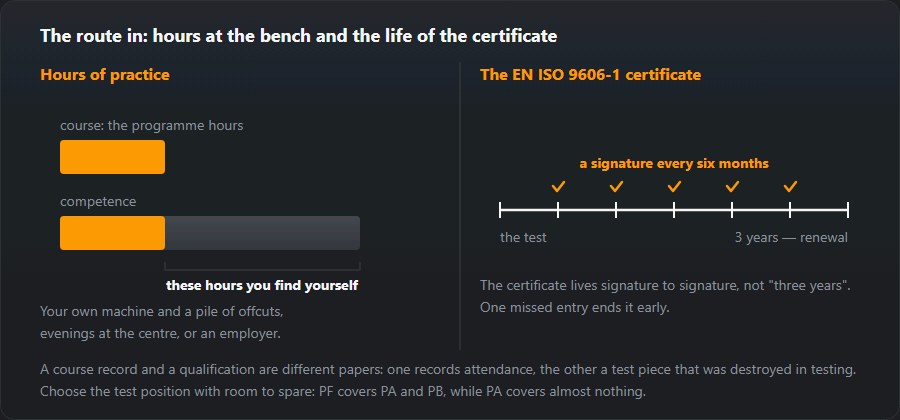
The course gets you to the test piece, not to production pace. Confidence comes from practice beyond it: your own machine and a pile of offcuts, or an employer who lets you practise, or evening access at the training centre.
Practise deliberately rather than by volume. Run beads on plate until they are the same width along their whole length. Then fillets, then butts with a gap, then the same joints in PF. Cut your welds and look at the section — a macro-section, even an unetched one, tells you more about your penetration than a photograph of the bead face ever will.

How long a welding course takes
For a beginner, on the Polish market this site tracks:
- MAG (135) — 3–4 weeks, a programme of 120–160 hours;
- MMA (111) — 3–4 weeks, 120–150 hours;
- TIG (141) — 4–5 weeks, 140–180 hours;
- flux-cored (136) — 3–5 days as an add-on after 135, not as a first course;
- pipe and positional — 2–4 weeks after the basic course;
- the test alone, for someone who already welds — 1 day.
The hours are the whole programme, not bench time alone.
No prices here — they vary several-fold between centres. Compare offers part by part. How many hours at the bench. The test material — unalloyed plate is cheaper than pipe or stainless. Which body examines, and whether it comes to the centre. Which examination of the test piece is included — visual alone is the cheapest, radiography and ultrasonic cost more, destructive testing the most. Whether the certificate and the welder’s book are included, and what a second attempt costs. A cheap offer usually saves on the testing or on the hours.
The certificate
An examination at an accredited body, to EN ISO 9606-1. It is not the same thing as a course certificate, and the difference is the whole point: one records attendance, the other records an examined test piece that was destructively tested.
Choose the test position deliberately, because positions cover downwards. A test in PF covers PA and PB; a test in PA covers almost nothing else. Paying twice — once for the easy test and again for the useful one — is a common and avoidable expense. What a given test covers is worked out in the qualification range calculator, and the examination itself is described in the EN ISO 9606 test.
The EN ISO 9606-1 test, step by step
- Theory — the process, materials, safety, reading weld symbols and a WPS.
- The test piece — welded to a given WPS, in a given position, in a given material. The piece is marked with its position and may not be moved out of it.
- Visual examination — always, and first. A piece rejected visually goes no further.
- Further testing to the scheme: radiography or ultrasonic, or — more often on fillets — destructive tests: fracture, macro-section, bend.
- Assessment — against quality level B of ISO 5817 unless the scheme says otherwise.
What you walk away with is easiest to see on an example.
135 P BW FM1 S t10 PF ss nb is a typical certificate for a
structural shop welder:
| In the example | What it encodes | What it means on this certificate |
|---|---|---|
135 | The process to ISO 4063 | MAG with solid wire in active gas. It does not cover MMA (111) or TIG (141) |
P | Product form | Plate. Pipe only when rotated from 75 mm diameter, fixed from 500 mm |
BW | Weld type | Butt weld — the joint that was tested on the piece |
FM1 | Filler group to EN ISO 9606-1 | Filler for unalloyed and fine-grain steels, i.e. ordinary structural steelwork |
S | Filler material | Solid wire. Flux-cored is another process (136) and another code |
t10 | Test piece thickness, mm | A 10 mm test piece, thickness range 3–20 mm |
PF | Position to ISO 6947 | Vertical up; covers PA, PB, PF |
ss | Welded from one side | Nobody back-welds the root — its penetration bead is visible and judged along with the cap |
nb | No backing | No backing: you form the root yourself, no copper or ceramic underneath |
In practice: with that certificate you weld 3–20 mm plate, butt joints, solid wire, flat, horizontal-vertical fillet and vertical up. Horizontal (PC), overhead (PE) and vertical down (PG) are outside the range, and fixed pipe is practically outside it too.
Why test pieces fail: defects you can see
Many defects show at the visual stage, before anyone takes a radiograph. Four keep coming back with beginners:
- Undercut at the toe — a groove along the edge of the weld. Current too high, arc too long, or no pause at the edges when weaving. More under weld undercut.
- Lack of root penetration — from the back you can see the
unfused edges of the preparation. Gap too small, current too low, travel
too fast. The usual way an
ss nbpiece fails: incomplete root penetration. - Porosity and craters at restarts — a draught in the booth, dirty plate, too much wire stick-out, or a cold restart that does not overlap the previous run; see porosity.
- Slag and lack of fusion between runs — a root not cleaned before the fill, or MAG running on the front of the pool. It shows up in the macro or the fracture as an unbonded layer.
How to train for the test: PA → PB → PF → PE
Each position adds one difficulty to the last. Practise on 8–10 mm offcuts and move on only when the previous stage comes out the same every time.
- PA, beads on plate, then a butt with a gap. Check: turn the plate over — the penetration bead is continuous, with no gaps.
- PB, a T-joint fillet. You learn to hold the angle and stop the weld sagging onto the bottom plate. Check: break the fillet with a hammer in a vice — the fracture shows root fusion and porosity.
- PF, vertical up. About 15 % less current: a 3.2 mm electrode run at around 115 A in PA drops to around 100 A. Dwell at the edges, move quickly across the middle.
- PE, overhead — last. About 20 % less current, around 90 A for the same electrode, a short arc and a small pool.
In the week before the test weld nothing but the test piece: same material, thickness, preparation and position, with a stop and restart in the middle of the run. Cut or break every one — nothing else tells you the truth.
The first six months in a job
Expect tacking, grinding and simple fillets first, and full welds once the foreman sees you holding size. Use the time for three things a course does not teach. Speed: the same weld in half the time with no repairs. Reading a drawing and a WPS: leg length, run sequence, current from the procedure rather than from habit. Distortion: the welding sequence on a long member so that it does not need straightening afterwards.
Where it goes from there
The pay curve follows the certificates and the positions. Plate MAG in the flat position is the entry level. Pipe, positional work, TIG root runs, stainless and duplex, and offshore or pressure work are the steps up, and each one is a combination of another qualification and another few hundred hours.
Beyond welding itself the routes are inspection — a visual inspection qualification and then a welding inspector certification — and coordination, the IWS and IWE route, which moves you from making the welds to specifying them. Both pay better than the arc and both start from having welded.
What the certificates and courses cost, and what welders are actually paid, is in welding course cost and what a welder earns.
How long the certificate lasts and how it is renewed
Under EN ISO 9606-1 the certificate runs for three years but rests on confirmations: every six months the person responsible for welding, or the examiner, signs that you are still working within its range. Miss one and the certificate is dead, however far off the end date looks. The first one falls due six months after the test — put the date in your phone.
Renewal is clause 9.3 of the standard, and there are three routes — as described in the same way by the Welding Development Centre (UK) and Metlab (Ireland):
- a re-test every three years;
- every two years on two production welds from the last six months that have passed testing — if they are acceptable, the certificate runs for another two years;
- no end date while you work for the same manufacturer under an ISO 3834-2 or -3 quality system with documented weld quality.
The six-monthly confirmation applies on every route; which route is open to you is decided by the body that issued the certificate. In Poland the entries go into a welder’s book (książeczka spawacza), which authorises nothing by itself, and pressure equipment under technical supervision needs a separate UDT examination — details in welding qualifications in Poland.
Frequently asked questions
How long before I can earn a living at it?
Three to six months to reach employable competence in one process, if you practise seriously. Two to three years to be genuinely good. The gap between "passed the test" and "fast and consistent all day" is the part nobody advertises.
Do I need a formal qualification, or is skill enough?
Skill gets you the job; the certificate gets you onto the site. Anything covered by EN 1090 or pressure legislation requires a valid EN ISO 9606 certificate for the joints being made — no certificate, no arc, however well you weld.
Is welding a dying trade?
Automation has taken the repetitive production work and left the rest: site work, pipe, repair, one-off fabrication, anything positional or awkward. Those are the parts that are hardest to automate and where the shortage is, which is why rates for coded pipe welders have gone up rather than down.
How long does a welding course take?
A basic MAG (135) or MMA (111) course takes 3–4 weeks, TIG (141) 4–5 weeks, and a pipe course 2–4 weeks on top of the basic one. Flux-cored (136) is a 3–5 day add-on after 135. The test alone, for someone who already welds, is one day.
What does a welding course cost, and how do I compare offers?
Prices vary several-fold between centres, so compare the parts rather than the total: bench hours, test material, the examining body, how the test piece is examined (visual, radiography, ultrasonic, destructive), and whether the certificate, the welder’s book and a resit are included. Cheap offers usually save on testing or on hours.
Updated: