Fences
All you see of a fence is the infill; what works is underground. So the conversation is better started not with profiled sheet but with the soil: it decides whether the fence still stands straight after three winters.
A whole bay
A fence bay is two posts, two rails between them and the infill on the rails. A top rail runs along the top and a gap is left to the ground. Everything else is variations on those four parts.

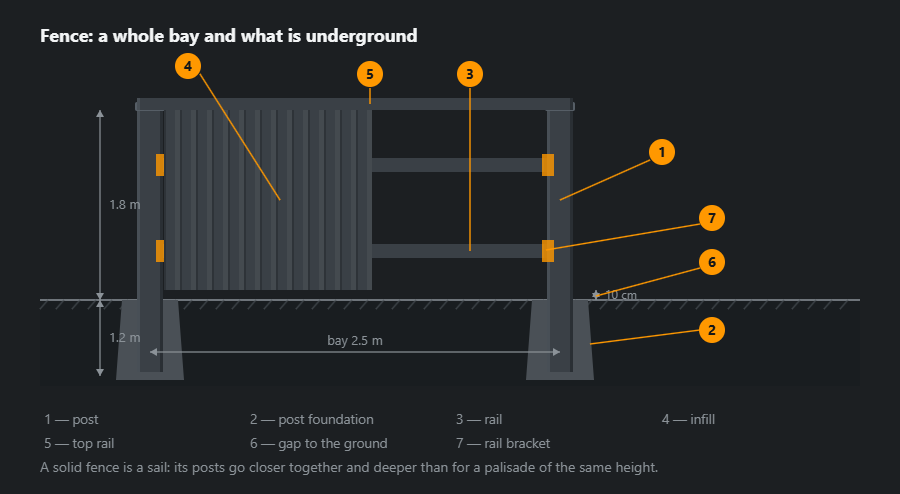
That proportion is worth remembering: for a fence 1.8 m high, about 1.2 m of post sits in the ground. A third of the tube is never seen — and it is the part holding everything up.
What closes the bay

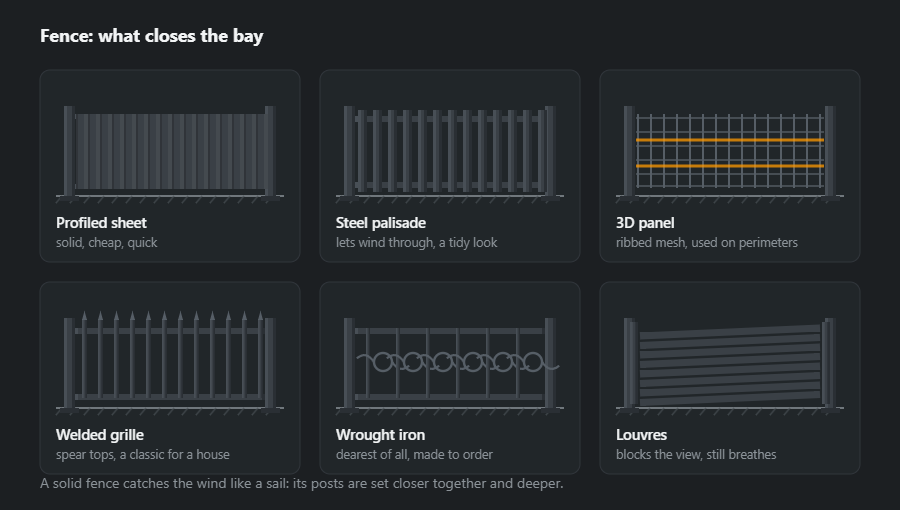
Infills fall into two groups, and not by price. Solid ones — profiled sheet, louvres, close ironwork — shut the yard off but catch the wind; their posts go closer together and deeper. Open ones — palisade, 3D panel, welded grille — let the wind through and allow a wider bay.
- Profiled sheet — the cheapest way to close a plot completely, and it goes up in a day.
- Steel palisade — dearer, but tidier to look at and no sail.
- 3D panel — a factory answer for long perimeters: quick, even, no welding on site.
- Welded grille with spear tops — the classic in front of a house; made to the size of the bay.
- Wrought iron — dearest of all and always to order.
Posts: six ways of setting them
Choosing the method is choosing for the soil, not for the budget. On firm clay everything works; on heaving ground with a high water table the concrete is pushed up along with the post, and by spring the fence stands in a wave.

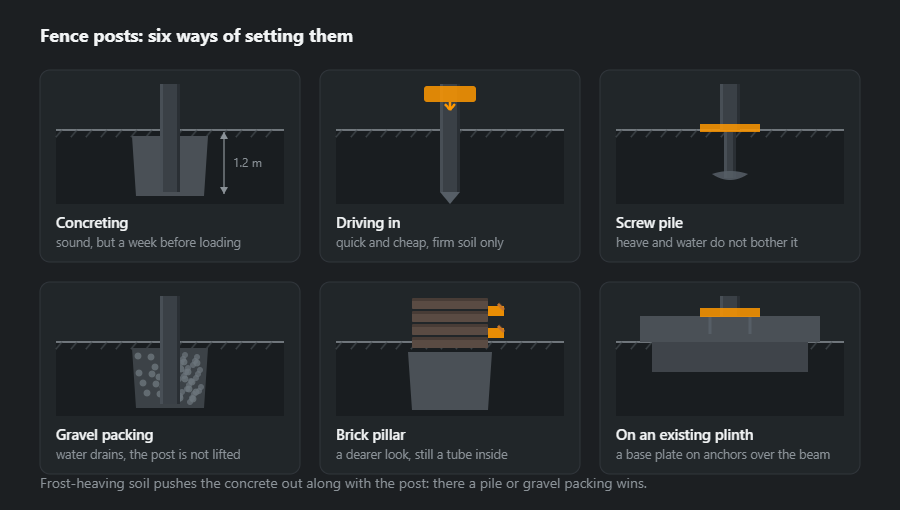
Gravel packing is often underrated: the post is driven or set in a bore, and the annulus is filled with compacted gravel. Water drains away, there is nothing to freeze around the post, and it costs less than concrete. There is one catch — it will not do for the posts of a heavy gate.
Which sections, and why
A fence post is a cantilever fixed in the ground: wind pushes on the infill, and the whole moment goes into the point where the tube enters the concrete or gravel. That is why the post is a hollow section and the saving is made on the infill:
- post for open infill — 60×60×3, 5.19 kg/m;
- post for solid sheeting or next to a gate — 80×80×4, 9.22 kg/m;
- rails — 40×20×2, 1.68 kg/m, or 40×40×2, 2.31 kg/m, for long bays;
- pickets — 20×20×2, 1.05 kg/m, or 25×25×2, 1.36 kg/m.
A 40×20 rail goes with its long side vertical: for the same mass it sags less under the pickets and does not hold water on a flat face. A hollow section rather than an angle also makes sense in the infill — an angle collects water and leaves in every flange. Masses of other sizes are in the tube and hollow section calculator.
Joints and welds
A fence is mostly non-structural parts, and the walls are thin: for a 2 mm tube the 0.7·t rule gives 1.4 mm, far below a3, the smallest load-bearing fillet under EN 1993-1-8. On pickets and rails the weld is there above all to seal the joint without burning through — the right current and short runs matter, not the size. Only the rail-to-post joint and the post-to-gate-plate joint carry load; there the rules from the fillet weld calculator apply.
- Weld all round, not in tacks — a picket held by two tacks leaves a gap where water collects, and the rust starts from inside.
- Caps on the posts — an open tube fills with water, which freezes in winter and splits the section just above the ground.
- Panels welded in the shop, fixed on brackets — welding on a galvanised post on site burns off the zinc; every such spot has to be cleaned and touched up with cold zinc.
How to weld thin tube without burning through is covered in the article on welding square tube.
Order of fabrication and installation
- Survey and setting out — the boundary, the gate and side-gate positions, post spacing fitted to the length of each side, not the other way round.
- Bill of materials and cutting plan — how many posts, rails and pickets, and how to cut them from stock bars.
- Panels in the shop — welded on a flat table on a jig so that they all come out the same.
- Coating — hot-dip galvanising, galvanising plus powder, or paint, before the panels leave for site.
- Posts — ends and corners first with a line between them; then the intermediate posts to the line and level.
- Waiting for the concrete — about a week before hanging the panels; with gravel backfill or ground screws you can go straight on.
- Panels, gate, side gate — finally adjustment and coating touch-up.
Corrosion protection
A fence spends its whole life in the rain, and by a road in salt as well. Primer and enamel give 3–5 years to first rust, powder coating 7–10, hot-dip galvanising over 25, and zinc plus polymer over 30 years — and on a roadside fence the difference shows after a few winters. The post just above the ground rusts fastest, as does every spot cut or welded after galvanising. Profiled sheeting is not cut with an angle grinder: the overheated edge loses its coating and rusts first.
Typical mistakes
- Solid infill on widely spaced posts — the fence acts like a sail, and the posts lean after the first storm.
- Concrete in frost-heaving ground — by spring the fence stands in waves; there use gravel or ground screws.
- No gap at ground level — the bottom edge stands in water and snow and rots from below.
- Posts without caps — water in the tube freezes and splits it.
- Welding on zinc without touch-up — the burnt spot rusts in the first season.
How to work out materials: 25 m of fence
A straight fence 25 m long and 1.5 m high, ten bays of 2.5 m, 11 posts of 2.6 m (1.5 m above ground and 1.1 m in concrete), two rails per bay, 1.4 m pickets at 12 cm centres — 20 per bay. No gate or side gate.
| Member | Section | Length, m | Qty | kg/m | kg |
|---|---|---|---|---|---|
| Post | 60×60×3 | 2.60 | 11 | 5.19 | 148.4 |
| Rail | 40×20×2 | 2.50 | 20 | 1.68 | 84.0 |
| Picket | 20×20×2 | 1.40 | 200 | 1.05 | 294.0 |
| Total | 526.4 | ||||
| With 5 % allowance | 553 | ||||
That is 526 kg net and 553 kg with allowance — over 20 kg per running metre, more than half of it pickets. This is where the bar cutting plan pays most: a 6 m bar gives four 1.4 m pickets and leaves almost 0.4 m of offcut. A 1.2 m picket also gives only four, because five with a 3 mm kerf exceed 6000 mm — while a 1.19 m picket gives five. Decisions like this are made before the steel is ordered. The whole job, with the gate and gate posts, can be reworked in the bill of materials calculator.
Where to go next
A fence is almost never ordered separately from the gates and wickets: they share the infill, the colour and the logic of the posts — only the gate posts go deeper. If the perimeter also needs window grilles, see grilles, doors and hatches. Price and lead time are in how ordering works.
Frequently asked questions
What bay width should I use between posts?
2.5–3 m for a light infill, 2.0–2.5 m for solid profiled sheet. A solid fence works as a sail, and as the bay grows the load on the post rises faster than the saving on the number of posts.
How deep does a fence post go?
1.0–1.2 m when concreted — below the frost line. On heaving ground the concrete is pushed out along with the post, and there a screw pile or gravel packing wins: they let the water leave instead of holding it against the post.
Why leave a gap at the bottom?
So the lower edge does not stand in water and snow. The usual gap is 8–12 cm: enough to keep the fence from rotting from below and to let a mower under it, too little for a dog to get through.
How long does a profiled sheet fence last?
As long as its coating does. A polyester layer over zinc holds 10–15 years, provided the sheets are not cut with an angle grinder on site: an overheated edge rusts first. Posts and rails outlive the infill and are usually replaced once in the life of the fence.
What section are steel fence posts made from?
For open infill (pickets, 3D mesh panels, railings) most often 60×60×3 tube — 5.19 kg/m; for solid sheeting, which catches the wind like a sail, the post is heavier and spaced closer, for example 80×80×4 (9.22 kg/m). Rails are 40×20×2 or 40×40×2. The post must be longer than the fence by the part in the ground: 1.0–1.2 m when set in concrete.
How much steel goes into 25 m of picket fence?
In the example on this page — a 1.5 m high fence, 11 posts of 60×60×3, 40×20×2 rails and 20×20×2 pickets at 12 cm centres — it comes to about 530 kg net and about 550 kg with allowance, over 20 kg per running metre. More than half of the mass is pickets, not posts.
Updated: