Steel carports
A carport looks simple: four posts and a roof. Yet it is exactly where people economise on what cannot be put right later — on the depth of the footing, the section of the post and the fall of the roof. Here it is taken apart joint by joint, in the order the shop actually works through it.
The carport as a whole
A mono-pitch carport for one car is two front posts and two rear ones, a load-bearing member along the front edge, purlins across it and roofing on top. The load travels downwards: snow lands on the roofing, the roofing passes it to the purlins, the purlins to the truss, the truss to the posts, the posts to the foundation. The weakest link in that chain sizes the whole structure, and it is rarely the part people look at.

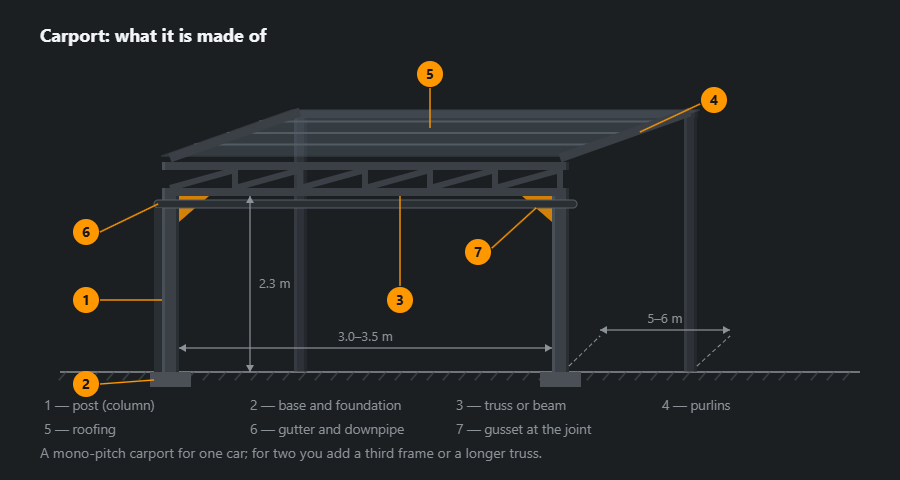
Those dimensions are not about looks. A width of 3.0–3.5 m is the car plus an open door; 5–6 m of length is the car plus room to walk round the front; 2.3 m of clear height is a car with a roof box. For two cars you do not build a wider carport — you add a third frame or a longer-span truss.
Posts: six options
The section is chosen by span and snow load. Warsaw design snow is 0.9 kPa, roughly 90 kg on every square metre of roof, which on a 3×6 m carport adds up to nearly two tonnes. Section and span are set by a calculation for local snow and wind; on small carports 80×80×4 (9.22 kg/m) and 100×100×4 tubes are the ones most often seen.

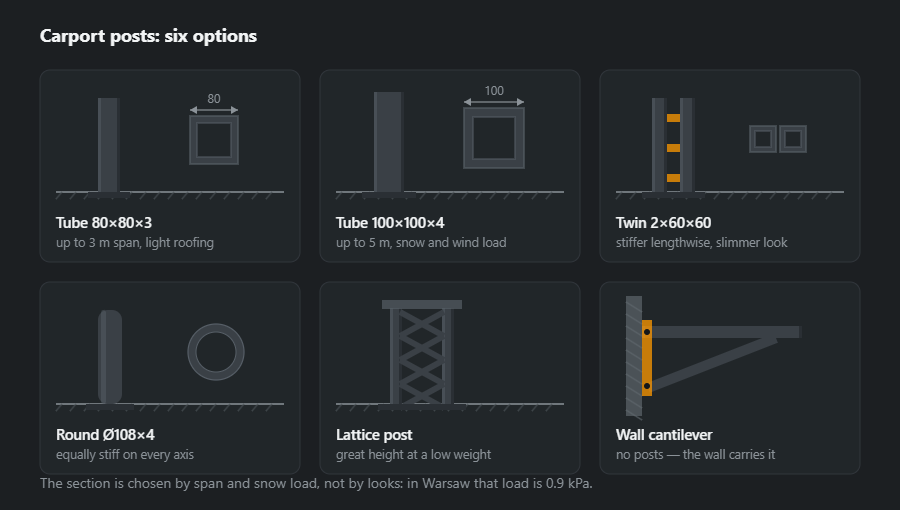
Two of these six solve space rather than strength. A wall-mounted cantilever removes the front posts altogether: the carport hangs off the house and there is nothing to catch a car door on. A lattice post earns its place where the height is large and the weight must stay down — it is a truss stood on end.
How the post holds on to the ground
This is the most expensive joint to correct: redoing it after erection means dismantling the carport. The choice follows what is already on site.

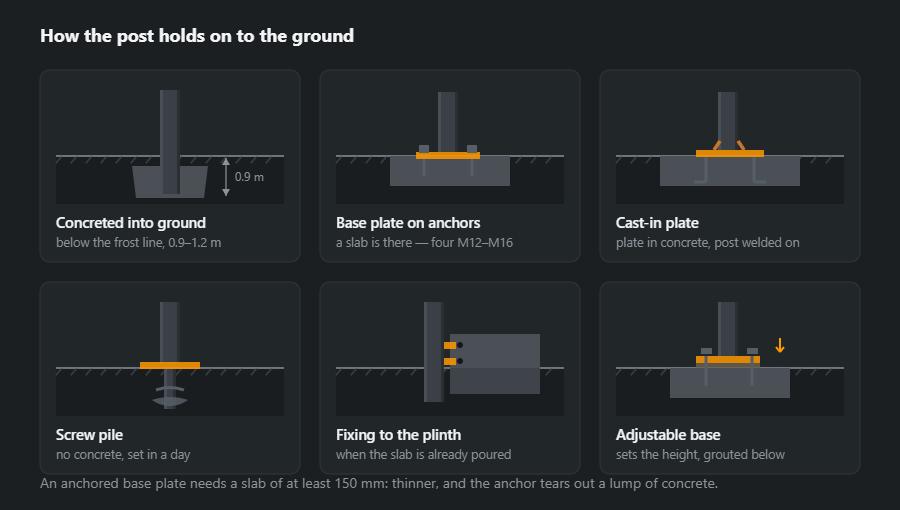
- Concreted into the ground — cheapest on material, but below the frost line and with a week of waiting.
- Screw pile — no concrete and no waiting, and it takes heaving in its stride; set in a day.
- Base plate on anchors — when the slab is already poured. It has to be a real slab, 150 mm and up, not a levelling screed.
- Adjustable base — for a sloping yard: the height is set on site and grout goes underneath.
The top: beam or truss
Up to four metres of span there is nothing to argue about — a profile beam is simpler and cheaper to make. Beyond that the truss starts to win: at the same span it weighs half as much, so the posts under it get lighter too. You pay for that in joints, and every joint is cutting, fitting and welding.

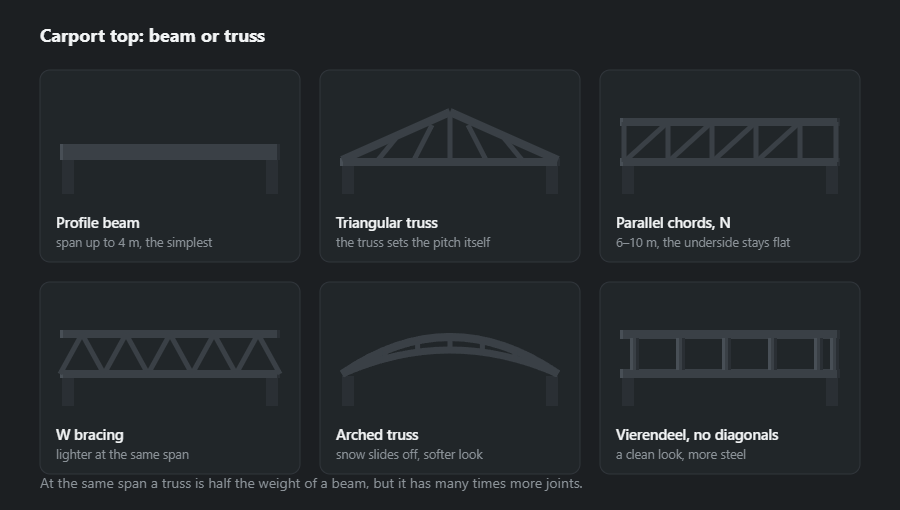
A triangular truss sets the pitch itself, so it needs no posts of differing height. A parallel-chord truss keeps the underside flat, which matters when the soffit is visible from below and a clean line is wanted. The arched one is for polycarbonate: the sheet bends to a curve and hates a crease.
Roof shape

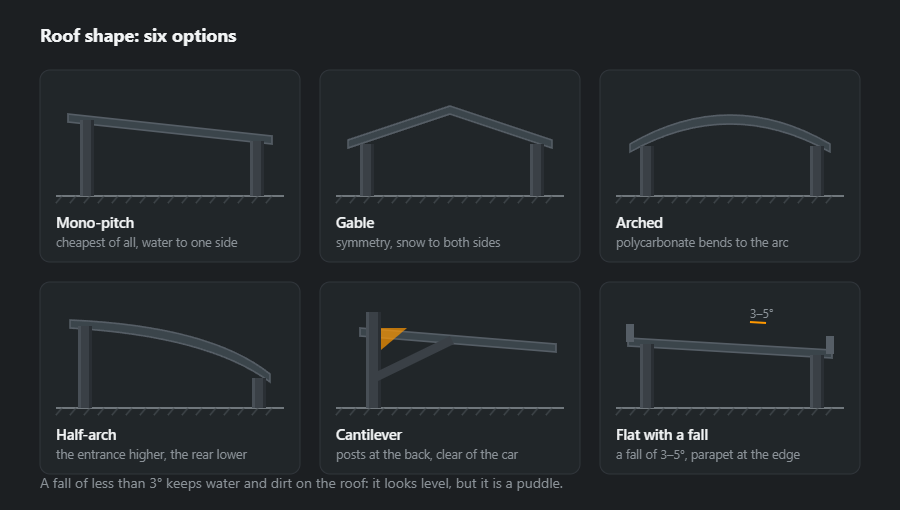
The cantilever carport stands apart from the rest: both posts move to the back, and nothing is left in front of the car to catch a door on. You pay for that in steel, because a cantilever works in bending and the section grows. The flat-with-a-fall version belongs where the carport meets the house and must not argue with its roof; a parapet runs along the edge and the water goes into a downpipe.
Reinforcement: what to add when it moves
A carport that shifts in the wind almost never bends in mid-span — it is the connection that moves. So the reinforcement goes into the joint.

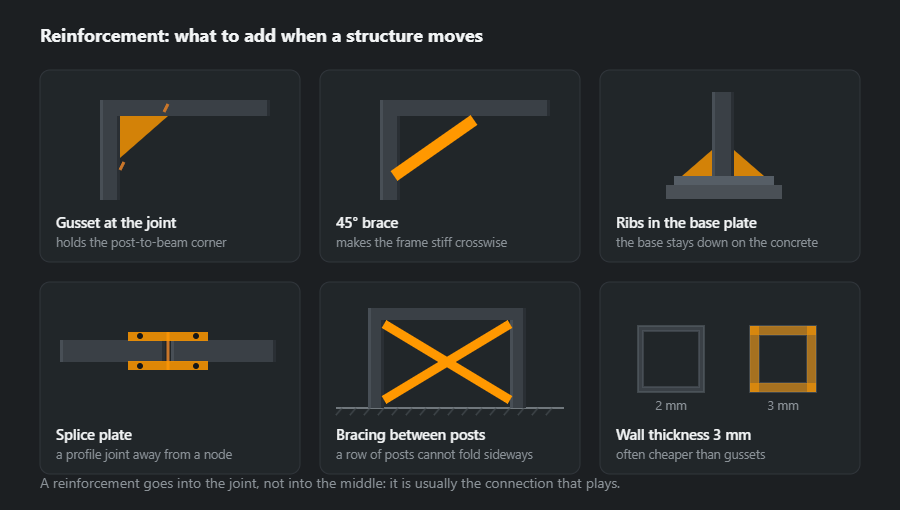
Sometimes the cheap answer is not a gusset but an extra millimetre of wall: 100×100×3 and 100×100×4 differ in price by less than a dozen gussets cost once cutting and grinding are counted. That sum is worth doing before the cutting list, not after.
Cantilever carport: how it is built
In a cantilever carport the posts stand in a single row at the back and the roof beams reach forward with no support. There is nothing in front of the car — no post to catch with a door, nothing in the way when clearing snow off the drive. The price of that convenience is mechanical: what the front posts carry in an ordinary carport is taken here by bending. The moment from snow at the tip of the cantilever goes into the beam-to-post joint, down the post to the base and into a foundation that has to resist overturning.
- Post — a bigger section than in a four-post carport with the same roof; often an I-beam or a rectangular tube set with its long side in the plane of bending.
- Beam-to-post joint — rigid: an end plate with bolts or a weld with stiffeners. The pin that is enough for an ordinary carport means a sagging roof here.
- Base and foundation — more anchors spaced further apart, a thicker base plate, a heavier concrete pad. Ground screws are used only when the manufacturer states a moment capacity for them.
- Tie-rod version — a short mast rises above the post and a rod with a turnbuckle runs from it to the tip of the cantilever. Bending turns into tension in the rod, so the beam can be lighter. The rod works only in tension: under wind uplift it goes slack and the whole moment returns to the beam, which is why this version is also designed by an engineer.

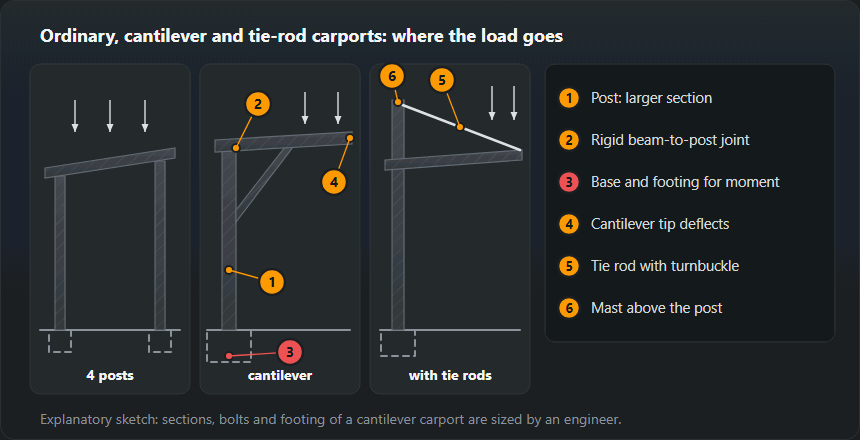
A cantilever carport is a loaded structure with no reserve in the form of a second row of posts. The post and beam sections, bolts and foundation come from the engineer's design; this page explains what it is made of and where the weak points are.
Which sections a carport is made of, and why
Posts and beams are made from hollow sections. A square tube is equally stiff in both directions, has no flanges for water and leaves to collect on, and is easy to paint all round. The mass per metre comes from the table, not from memory:
- 100×100×4 — 11.7 kg/m, the most common post for a one- or two-car carport;
- 100×100×5 — 14.4 kg/m, when a thicker wall is preferred to gusset plates;
- 120×60×4 — 10.5 kg/m, the longitudinal beam set on edge;
- 60×40×3 — 4.25 kg/m, purlins under the sheeting and knee braces;
- IPE 160 — 15.8 kg/m, when the cantilever is long and a deep beam is needed.
A rectangular tube goes with its long side vertical: for the same mass, a beam on edge deflects noticeably less than one lying flat. An I-beam is stiffer per kilogram in one plane, but its open flanges must be painted on both faces and it needs caps where it meets a tube. Full weight tables — tube and hollow section weight and steel beam weight.
Joints and welds: what size to lay
The most heavily loaded weld in a carport joins the post to its base plate. The weld size is limited by the thinner part — here the tube wall. With a 4 mm wall the sensible upper limit is 0.7·4 = 2.8 mm, while the smallest fillet that EN 1993-1-8 accepts as load-bearing is a3 (leg z ≈ 4.2 mm). The window is narrow: the post is welded with an a3 fillet all round, and a stronger joint comes from a thicker wall (0.7·5 = 3.5 mm for 100×100×5) or from stiffeners, not from a bigger weld. The fillet weld calculator converts a ↔ z and shows the warnings.
There is little weld metal: six 100×100 posts mean 2.4 m of a3 fillet, about 0.19 kg at 0.078 kg/m. What costs money is not the deposit but the preparation: a square-cut tube end, a clean plate and a gap that lets the root fuse.
- Continuous welds, no gaps — an intermittent weld on a hollow section leaves slots that let water inside.
- Cap on the top of the post — without it water collects in the tube, freezes in winter and bulges the walls.
- Holes for galvanising — a frame going to hot-dip galvanising needs vent and drain holes in every closed length (EN ISO 14713-2); details in the article on welding square tube.
Order of fabrication and erection
- Survey and sketch — the real dimensions of the plot, the fall of the ground, where the gutter runs and where the water goes.
- Bill of materials and cutting plan — the list of items, the mass, the plan for cutting the stock bars; only then the steel order.
- Cutting and preparation — lengths from the plan, base plates drilled for anchors, caps.
- Welding the frames on a flat table — tack, check the diagonals, only then weld out; measure again once cool.
- Coating — zinc or paint before the structure leaves for site; paint applied in the shop is even and cures in controlled conditions.
- Foundations — footings or anchors are prepared in advance; concrete needs about a week before it takes load.
- Erection — posts, levelling with shims, beams, purlins, braces, finally the roofing and flashings. Coating damage from erection is touched up with cold zinc.
Welding the carport itself takes about a week in the shop, enamel dries for three to five days, and the longest stage is agreeing the sketch. The full timeline is in the article how to order.
Corrosion protection
A carport stands in the rain all year, so its life is more often decided by the coating than by the section. Life is counted to the first rust bloom: primer and enamel 3–5 years, powder coating 7–10, hot-dip galvanising over 25, zinc plus polymer over 30 years. Hot-dip zinc also protects the inside of the tube, where a brush cannot reach. The bottom of the post rusts fastest — the joint with the concrete, where water and road salt sit; a base plate above ground level usually lasts longer than a post cast into the ground.
Typical mistakes
- Pitch below 3° — the roof looks level, but water and dirt stand on the sheet.
- Anchored base plate on a thin screed — a slab of at least 150 mm is needed, otherwise the anchor pulls the concrete out.
- No bracing — the row of posts folds sideways under wind along the carport.
- “z6” instead of “a6” — leg length confused with throat gives a weld about 30 % weaker.
- Sealed tubes sent for galvanising — they can burst in the bath.
- Cantilever carport on an ordinary footing — a foundation sized for a post in compression rather than for a moment tilts over time.
How to work out materials: a 3×6 m example
A 3×6 m mono-pitch carport on three pairs of posts (a 3 m beam span, within the range of a beam made from a tube). The front posts are 20 cm taller than the rear ones: over a 3 m width that gives a pitch of about 4°. The set is an example of working out mass, not a design — sections for a given load are chosen by an engineer.
| Member | Section | Length, m | Qty | kg/m | kg |
|---|---|---|---|---|---|
| Front post | 100×100×4 | 2.70 | 3 | 11.7 | 94.8 |
| Rear post | 100×100×4 | 2.50 | 3 | 11.7 | 87.8 |
| Longitudinal beam | 120×60×4 | 6.00 | 2 | 10.5 | 126.0 |
| Purlin | 60×40×3 | 3.40 | 7 | 4.25 | 101.1 |
| Knee brace | 60×40×3 | 0.80 | 8 | 4.25 | 27.2 |
| Total | 436.9 | ||||
| With 5 % allowance | 459 | ||||
That is 437 kg net and 459 kg with a 5 % allowance — the same as the bill of materials calculator shows, where you can add the base plates and anchors. Before ordering, run the purlins through the bar cutting plan: a 6 m bar yields one 3.4 m purlin and a 2.6 m offcut. That is why the braces here are the same section — all eight at 0.8 m come out of three offcuts, and no separate bars need buying for them. The second trap: two 3000 mm pieces will not fit in a 6000 mm bar, because the saw eats about 3 mm at every cut — a 2995 mm purlin solves it.
Where to go next
If the carport is fixed to the house and has to cover the entrance, see door canopies: the same question of anchoring into a wall, but with the load arriving at two points. If it later gets clad with walls it becomes a garage, and ventilation has to be thought about in advance. Price, lead time, coating and fixings are in how ordering works.
Frequently asked questions
What does a single-car carport cost?
The price is built from six parts: steel is about a third, then cutting and bending, welding and assembly, coating, installation and delivery. That is why tube you buy yourself hardly moves the quotation — it only changes the first third. The breakdown is in how ordering works.
Can a carport be built without concrete?
Yes, on screw piles. They work the moment they are wound in, need no week of curing and cope better with soil that heaves. Concreting into the ground is still cheaper on material, but it means waiting and getting below the frost line — in Warsaw that is 0.9–1.2 m.
What fall does a carport need?
No less than 3°, and in practice 3–5°. A shallower fall looks level to the eye, but water and dirt stay on the roof, and in winter ice joins them. The fall comes either from the truss itself or from front and rear posts of different heights.
Polycarbonate or profiled sheet?
Polycarbonate lets light through and bends to a curve, so it goes on arched and half-arch carports. Profiled sheet is cheaper, stiffer and does not yellow, but it is dark underneath and noisier in rain. For one car sheet is the usual answer; against a house with windows onto the yard, polycarbonate.
What is a cantilever carport and what should you watch for?
The posts stand only at the back and the roof reaches forward like a shelf. The cantilever works in bending, so the whole moment goes down into the post and the foundation: the footing has to be larger or deeper, with more anchors spaced further apart, and the post and beam sections grow. The version with tie rods passes part of the load into bars in tension. The sizes of such a carport are chosen by a structural engineer — a cantilever carport has no reserve in the form of front posts.
How much steel goes into a 3×6 m carport?
In the example on this page — six 100×100×4 posts, two 120×60×4 beams 6 m long, seven 60×40×3 purlins and eight knee braces — it comes to about 440 kg net and about 460 kg with a 5 % cutting allowance. That excludes plates, anchors and roofing. Your own set can be totalled in the bill of materials calculator, which gives the mass of each line and the sum.
What weld size for a carport post?
With a 4 mm wall the rule “a no more than 0.7 of the thickness” gives 2.8 mm, while the smallest load-bearing fillet under EN 1993-1-8 is a3 (leg about 4.2 mm). So the post is welded to the base plate with an a3 fillet all round, without gaps. When the engineer needs a stronger joint, the wall of the section is increased or stiffeners are added, not the weld size.
Updated: