pWPS (preliminary welding procedure specification): what it is and why not to weld to it
A pWPS looks like a finished specification and carries exactly the same fields. One thing separates them: nobody has yet checked whether the parameters written in it produce a weld that meets the requirements. It is a proposal, not proof.
Short answer
A pWPS (preliminary Welding Procedure Specification) is a draft procedure. The welding engineer sets out the process, the material, the joint preparation, the current settings, the gas, the preheat and the run sequence — everything that will appear in the finished WPS. A coupon is then welded to the pWPS, the coupon is tested, and if it passes, a WPQR is issued and the specification becomes a full WPS.
The three documents in one sentence: the pWPS proposes, the WPQR proves, the WPS governs.
Where its numbers come from
A pWPS is not guesswork — every field has a source. This part of the job is what separates a welding engineer from an operator:
| Field | Where the value comes from |
|---|---|
| Process to ISO 4063 | The engineer's choice — process numbers |
| Material group to ISO/TR 15608 | From the steel certificate; the group drives the qualified range |
| Joint preparation to ISO 9692-1 | Thickness and access — joint preparation |
| Current, voltage, polarity | Electrode or wire diameter — welding current calculator |
| Heat input | Current, voltage and travel speed — heat input calculator |
| Preheat to EN 1011-2 | Carbon equivalent and thickness — preheat calculator |
| Shielding gas to ISO 14175 | Material and process — gas selection |
| Number and layout of runs | Groove area — deposit and run count |
The more carefully the pWPS is worked out, the better the odds that the coupon passes first time. A failed procedure test costs material, laboratory work and time, so this is not the stage to economise on.
How to fill in a pWPS: a worked example
A typical shop job: a butt weld in 10 mm S355 plate, process 135 (MAG with solid wire and active gas), flat position PA, access from both sides. This is the form the pWPS generator puts together — below, field by field, what goes in and where each value comes from.
| Field | Value in the example | Where it comes from |
|---|---|---|
| Process | 135 (MAG) | Chosen for production. Each process is qualified on its own: a 135 coupon does not cover 136 |
| Parent material | S355, group 1.2 to ISO/TR 15608 | The steel certificate; the group drives the filler choice and which steels the qualification covers |
| Joint and thickness | Butt, plate, t = 10 mm | The drawing and the coupon plan; coupon thickness sets the future range |
| Position | PA | The coupon plan (see planning below) |
| Joint preparation | Single V, 50–60° included angle, 1–3 mm gap, 1–2 mm root face | Thickness and access from both sides — joint preparation |
| Filler | EN ISO 14341-A G 46 4 M21 4Si1, wire Ø 1.2 mm | Classification to suit group 1.2 and M21 gas; diameter to suit thickness and settings |
| Shielding gas | M21 — ArC-18 (ISO 14175), 16–18 l/min | Process and material; the same gas appears in the wire designation |
| Polarity | DC+ (electrode positive) | Normal for MAG with solid wire |
| Current and voltage | 220–280 A, 26–29 V | The “8–10 mm” row of the site's MAG settings table — a starting band, not a measurement |
| Runs | Multi-run | A 10 mm V groove cannot be filled in one run; the number of runs affects the range |
| Preheat | No standard value entered | For group 1.2 up to 20 mm the generator sets none; the exact figure comes from EN 1011-2 via the CE of the heat: carbon equivalent and preheat |
| Interpass temperature | 250 °C max | The generator's limit for this group |
| Post-weld heat treatment | Not required | The generator sets none for group 1.2 |
| Heat input | blank | Depends on travel speed, which is measured on the coupon — heat input calculator |
| WPS / WPQR number | blank | The WPQR number only exists after testing |
| Manufacturer, welder, date, signature | blank | Filled in at your end: the company, the coupon welder, the welding coordinator |
The blank lines are not laziness; they are the form being honest. Heat input entered before the coupon can only come from an invented travel speed. If a coupon welded to this pWPS passes, a multi-run butt weld at 10 mm gives a thickness range of 3–20 mm; had it been a single run, only 5–13 mm. You can check this in the WPQR range calculator.
One caveat: 220–280 A and 26–29 V is the starting band for this thickness. What goes into the WPQR is the current and voltage actually measured while the coupon was welded, and those figures, together with travel speed, fix the heat input from which the production tolerance is later worked out.
From pWPS to WPS, step by step
This is the usual route when qualifying by procedure test to EN ISO 15614-1. Each step has its own owner and its own output document, and an audit follows the chain through exactly those papers.
- Inputs. The manufacturer's welding coordinator lists what is to be welded: steel grades and their groups, thickness and diameter ranges, positions, and the customer's and product standard's requirements (impact and hardness or not, which EN ISO 3834 level). Output: a list of what the future range has to cover.
- pWPS. The coordinator writes and signs the specification: process, joint preparation, filler, gas, current and voltage bands, preheat, interpass temperature, run sequence. Output: a pWPS with its own number.
- Agreement. The manufacturer picks an examiner or examining body and goes through the pWPS, coupon dimensions and test scope with them in advance. Output: an agreed pWPS and test plan.
- Welding the coupon. The welder makes the coupon to the pWPS with the examiner or inspector present. For every run the actual current and voltage, travel speed (run length and time taken), preheat and interpass temperatures and gas flow are recorded. Output: a record of actual parameters and a marked coupon.
- Non-destructive testing. The laboratory carries out VT, then RT or UT and surface testing by MT or PT. Output: NDT reports.
- Destructive testing. The laboratory cuts and tests the specimens — tensile, bend, macro, and impact and hardness where required; which tests and to which standards is covered on the WPQR page. Output: test reports.
- WPQR. The examining body assesses the results, works out the range of qualification from the coupon's actual parameters and signs the record. Output: the WPQR.
- WPS. The coordinator issues one or more working specifications within that range, each with the WPQR number in its header. Output: a WPS at the workstation.

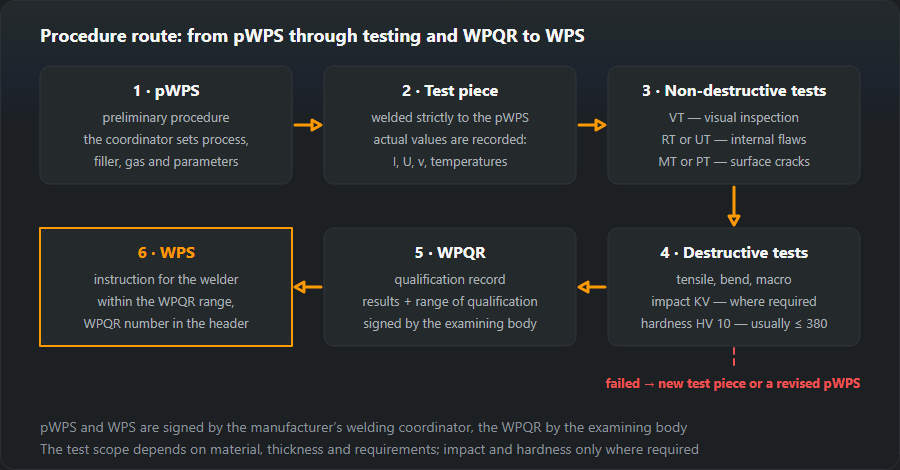
If the coupon fails
First, the reports are used to find the cause. If it lies in execution — dirty edges, a gap out of tolerance, welder error — the coupon is re-welded to the same pWPS by agreement with the examining body. If the defect comes from the procedure itself (settings, filler, preheat, preparation), the coordinator changes the pWPS, as a new revision or under a new number, and the cycle starts again with a new coupon. Results from a failed coupon do not carry over into a WPQR, but the reports are worth keeping: they show what needs to change.
A procedure test to EN ISO 15614 is the commonest route, not the only one. EN ISO 15607 also allows qualification based on tested welding consumables (15610), on previous welding experience (15611), on a standard welding procedure (15612) and on a pre-production welding test (15613). The manufacturer picks the route, but the customer and the product standard decide which routes are admissible in a given case.
Planning the coupon so it covers production
A coupon is expensive, so its parameters are chosen from production, not from what is easiest to weld. Four decisions settle almost everything:
- Thickness. A multi-run butt coupon at t = 10 mm covers 3–20 mm, at t = 12 mm 3–24 mm and at t = 20 mm 10–40 mm. If the shop runs from 4 to 30 mm, one coupon is not enough: 10 and 20 mm together cover 3–40 mm.
- Position. As long as there are no impact or hardness requirements, a coupon in one position covers all positions. Once those requirements apply, position starts to affect the range — worth deciding before welding.
- Plate or pipe. A pipe coupon covers pipe from 0.5·D. A plate coupon covers pipe only above a certain diameter — over 150 mm, and from 500 mm in some positions — so small-bore pipe needs a pipe coupon.
- Preheat and interpass. In production, preheat may be up to 50 °C lower than on the coupon and interpass up to 50 °C higher (except groups 8, 10 and 41–48). So do not preheat the coupon harder than the shop can realistically manage, and do not artificially hold interpass down.
The full treatment of ranges — thickness, diameter, heat input, material groups — is on the WPQR page and in the range calculator.
Common pWPS mistakes
- Settings that cannot be held in the stated position. A current band meant for the flat position is copied into a vertical or overhead pWPS. It shows at once on the coupon: the welder drifts out of the band and the actual parameters part company with the document.
- Filler of the wrong classification. Wire or electrode that does not suit the parent material group or the impact requirement. Checked by comparing the filler designation with the material group and the product requirements.
- Forgotten preheat. On thick material or steel with a raised carbon equivalent, nobody worked out the CE and no preheat was set. The risk is cold cracking, which shows up in the macro or in HAZ hardness.
- A coupon that is too narrow. Thickness and position were chosen for convenience and the range misses the thicknesses and positions the shop actually welds. The result is a second coupon that need not have been welded.
- Actual parameters not recorded. The coupon is welded but current, voltage and travel speed per run were never measured. Without them there is nothing to calculate heat input from and no honest basis for the WPQR.
- Invented values in the blank lines. Heat input or a WPQR number written into the pWPS in advance. A document like that misleads both the examiner and the welder.
- Production to the pWPS “while we wait for the report”. Everything welded before the WPS is issued is left without a qualified procedure behind it.
Why production must not be welded to it
Because nothing backs it. The parameters in it may well be right — and usually are — but nobody has checked them with a tensile, bend and impact test. A weld made to it may meet the requirements, yet no document shows that, and on work under EN 1090 or the pressure equipment directive the absence of that document is the same thing as non-conformity.
The only welding a pWPS covers is the procedure test coupon and the pre-production test to EN ISO 15613, where instead of a separate coupon a piece representing the real structure is tested.
Who draws it up
The manufacturer's welding supervisor — the welding coordinator to EN ISO 14731. The level of technical knowledge required (IWE, IWT, IWS) follows the quality level claimed under EN ISO 3834: comprehensive requirements call for an engineer, elementary ones allow a lower level.
It is the same person who is later answerable for production actually following the qualified procedure — and that is the real reason a pWPS is signed by a named individual rather than by "the technical department".
Frequently asked questions
Can production be welded to a pWPS?
No. A pWPS exists so that a test coupon can be welded and, where it applies, a pre-production test to EN ISO 15613 can be run. Production needs a specification backed by a WPQR, or qualified by one of the other routes in EN ISO 15607.
How does a pWPS differ from a WPS in content?
In content, not at all: the same fields to EN ISO 15609-1, the same level of detail. The difference is status — a pWPS is the welding engineer's proposal, a WPS is that proposal proven by testing. That is why a pWPS carries no WPQR number in its header and a WPS does.
Who signs a pWPS?
The manufacturer's welding supervisor — the welding coordinator to EN ISO 14731, in practice an IWE, IWT or IWS depending on the level of knowledge required. The same person is later answerable for production following the qualified procedure.
What does pWPS stand for?
pWPS stands for preliminary Welding Procedure Specification, the term used in EN ISO 15607 and EN ISO 15609-1. It is the draft of a future WPS: every field is filled in, but the parameters have not yet been proven by a tested coupon and a WPQR.
How long is a pWPS valid?
A pWPS has no validity period as such, because it is not a production document — it is a working draft that lives until the coupon is welded. If the coupon passes, a WPS carrying the WPQR number is issued on the back of it; if it fails, the pWPS is revised and a new coupon is welded. The WPQR itself has no expiry date either: it stands as long as the essential variables stay inside the range of qualification.
Can a pWPS be made with a generator?
A draft, yes. The pWPS generator on this site takes the process, material group, thickness, joint type and position and returns the joint preparation, filler, gas, current and voltage band and interpass limit, leaving blank the lines that can only be filled after the coupon. It does not replace preheat worked out from the carbon equivalent of the actual heat, a check against your own production, or the welding coordinator's signature.
Updated: