Welding 0.8–2 mm sheet: settings and technique
Below about 2 mm the problem stops being penetration and becomes heat: the sheet cannot get rid of it fast enough, and the pool falls through. Everything below is about putting in less heat, or taking it away faster.

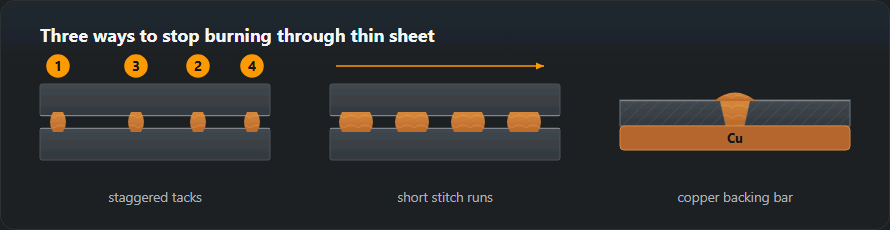
Fit-up decides the outcome
On thick plate a root gap is a feature. On 1 mm sheet it is a hole waiting to happen: there is no metal at the edges to bridge it, so the arc goes straight through. Clamp the sheets edge to edge along the whole seam before striking an arc — most burn-through blamed on settings is really a fit-up problem.
Tack every 30–50 mm, in this order: middle first, then the ends, then the middle of each remaining gap. Tacking sequentially from one end pushes all the shrinkage to the far end and the panel finishes bowed.
Settings
These are starting points. Test on an offcut of the same material and the same thickness, never on the job — and never on a different grade, because stainless holds heat where aluminium throws it away.
| Thickness | MMA | MIG/MAG | TIG |
|---|---|---|---|
| 0.8 mm | not recommended | 0.6 mm · 40–55 A · 15–16 V | tungsten 1.0 mm · 25–40 A |
| 1.0 mm | 2.0 mm · 50–65 A | 0.6–0.8 mm · 45–65 A · 16–17 V | tungsten 1.0 mm · 30–50 A |
| 1.5 mm | 2.0 mm · 55–70 A | 0.8 mm · 70–90 A · 17–18 V | tungsten 1.0 mm · 50–70 A |
| 2.0 mm | 2.5 mm · 70–90 A | 0.8 mm · 90–110 A · 17–19 V | tungsten 1.6 mm · 70–90 A |
Technique
Stitch, do not run. Weld 20–30 mm, stop, wait until the metal loses its colour, then start the next stitch overlapping the cold end of the last one. It feels slow and it is faster than repairing a blow-out.
Keep the torch moving and upright. A steep drag angle concentrates the arc into one spot. Around 10° from vertical, moving steadily, puts the heat where you want it and nowhere else.
Back the joint. A copper bar clamped behind the seam is the single most effective trick on this list. Copper conducts heat away fast and does not fuse to steel, so it holds the pool and then simply comes off. On stainless and titanium, backing doubles as a gas purge.
Point at the thicker side. When the two parts differ in thickness — sheet to angle, sheet to tube — aim the arc at the heavier one and let the pool wash onto the thin one.
Distortion
Heat that goes in has to come out, and while it does the metal shrinks. On thin sheet the shrinkage shows as waving. Less heat in means less waving: shorter runs, more of them, alternating along the seam, and the panel clamped to something rigid until it is cold. Skip welding — a stitch here, a stitch a hand's width along, then back to fill the gaps — spreads the shrinkage instead of concentrating it.
Which process for welding thin sheet metal
In a workshop the quickest route is MIG/MAG with 0.6–0.8 mm wire in short-circuit transfer. TIG wins where the weld stays on show, and on 0.8 mm sheet, where the table above no longer lists a stick electrode at all. Stick welding makes sense from 1 mm — a 2.0 mm electrode and a broken arc.
How to weld thin metal without burning through: MIG step by step
Everything rests on short-circuit transfer. At 16–22 V the wire touches the pool, shorts the circuit, the arc goes out and restrikes — 50–200 times a second. The pool stays cool. On 0.8–1.0 mm sheet you work at the bottom of that band, 15–17 V; how the transfer modes differ is covered on the MIG/MAG welding page.
- Wire and gas. 0.6 mm wire on 0.8 mm sheet, 0.6 or 0.8 on 1 mm, 0.8 mm from 1.5 mm up. Gas at 8–10 l/min on 0.8–1.0 mm and 10–12 l/min on 1.5–2 mm.
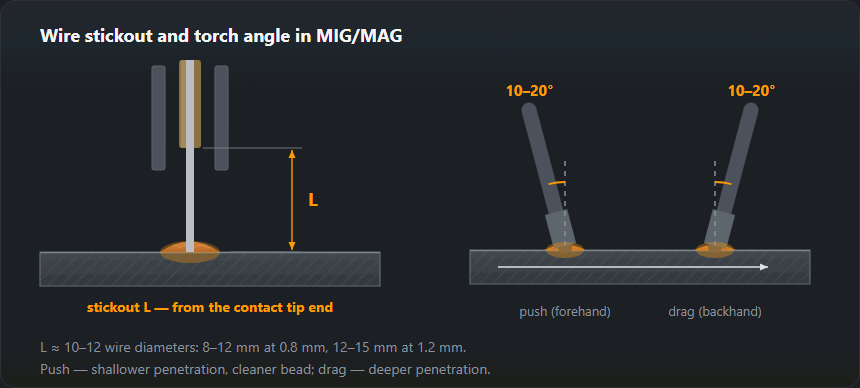
- Stickout. About 10–12 wire diameters: with 0.8 mm wire that is 8–12 mm from the contact tip. Too long and the arc wanders and spits; too short and the tip clogs.
- Travel angle. Tilt the gun forward 10–20° from vertical — push. Pushing gives shallower penetration and a cleaner face. Pulling drives the arc deeper: sometimes handy on 2 mm, a hole on 1 mm.
- Work angle. Square to the joint when both sheets are the same thickness; on unequal parts favour the heavier one, as described above.
- Tacks — pitch and order. Short and flat, at the spacing given in the fit-up section. Middle first, then the ends, then the middle of each space that is left.
- Skip or back-step. Split the seam into 20–30 mm stitches. Skip: one stitch near one end, the next in the middle, the next near the far end, then fill the gaps. Back-step: weld each stitch towards the previous one while the seam as a whole advances the other way. Start every new stitch on the crater of the last, so it always lands on cold metal.

TIG on thin sheet
The table gives 1.0 mm tungsten and 25–40 A on 0.8 mm sheet, 30–50 A on 1 mm. Filler rod 1.0–1.6 mm up to 1 mm and 1.6 mm on 1.5–2 mm; argon at 5–7 l/min on the thinnest and 6–8 l/min on 1.5–2 mm. Keep the arc short and dab the rod into the leading edge of the pool, not into the arc. With a pedal, back the current off as the sheet heats up — by the end of the seam you need clearly less than at the start.
Stick welding thin sheet
A 1.6 mm electrode runs at 40–60 A and is meant for 1–2 mm material; a 2.0 mm electrode runs at 50–80 A for 1.5–3 mm. The table on this page narrows that down: 1 mm sheet — 2.0 mm electrode at 50–65 A; 2 mm sheet — 2.5 mm electrode at 70–90 A. Run it as a broken arc: strike, lay a drop, lift, strike again next to it.
The other trick is welding vertical-down (PG). It is used precisely on thin sheet up to about 4 mm: electrode at 70–80° to the plate, tip pointing up, fast travel with no weave, and more current than vertical-up on the same thickness. On 1.5 mm that is a 2.0 mm electrode at 55–75 A. Limits and settings are in the vertical-down welding guide.
Worked example: 1.0 mm and 2 mm sheet
1.0 mm sheet, butt joint, MIG. Wire 0.6–0.8 mm, 45–65 A, 16–17 V, gas 8–10 l/min. Start at 45 A on an offcut of the same sheet and add 5 A at a time until a narrow, even bead shows on the back. Tack from the middle, skip-weld in 20–30 mm stitches, copper bar behind the joint. With a 2.0 mm electrode — broken arc only.
2 mm sheet, same joint. Wire 0.8 mm, 90–110 A, 17–19 V, gas 10–12 l/min. TIG: 1.6 mm tungsten, 70–90 A, 1.6 mm rod. Stick: 2.5 mm electrode at 70–90 A, or the same electrode vertical-down at 70–95 A.
Twice the thickness means roughly twice the MIG current (45–65 → 90–110 A). On 2 mm the stitches can be longer, but the tack order and the backing bar stay.
Symptoms and what to change
| Symptom | Cause | What to change |
|---|---|---|
| A hole instead of a bead | Current too high or the pause too short | Drop 5–10 A, lengthen the pause, switch to tacks |
| The bead sits on top without fusing | Current too low | Add 5 A, shorten the arc |
| Porosity along the whole run | Paint, zinc coating, rust | Clean wider, check the gas flow |
| The sheet has buckled | All the heat put into one place | Alternate the tacks, back-step, clamp it down |
| Sagging underneath | No backing, gap too wide | A copper bar, fit up with no gap |
Reading the bead on thin sheet
- A hole at the end of the seam — the sheet heated up as you went. Shorter stitch, longer pause, 5–10 A less. A hole right at the start means too much current or a gap in the joint.
- Lack of fusion — a tall, rounded bead, edges untouched, clean underneath. Add 5 A, shorten the arc, check that you are not travelling too fast.
- A string of beads — separate dots with unfused edge between them. On MIG: travel too fast, or voltage too low for the wire speed so the wire stubs into the plate. With a broken arc: the next drop placed too far away or after too long a pause. Each drop has to overlap the last.
Why the sheet warps and how to stop it
The strip of metal next to the weld heats up and tries to grow, but the cold sheet around it will not let it. Once cool it is shorter than it was and pulls the rest with it — on thin sheet that shows as a wave. So symmetry matters: weld from the middle outwards, alternating either side of the part's centre line, and on a frame or box do opposite seams one after the other. Do not pile metal on: a tall cap means more molten metal, more heat and more shrinkage. Keep the part clamped to the table until it is fully cold.
Practice drills
- Butt joints from 2 down to 1 mm. Start with two strips of 2 mm, then 1.5 and 1 mm, always with no gap and table settings. Passed when the back shows a narrow, even bead with no holes and the strip lies flat on the bench.
- Flanged edge. Turn up the edges of two strips and fuse them with TIG and no rod, or with short MIG stitches. It teaches you to run the pool along an edge — the place that burns through most easily. Good when you get an even rolled bead with no dips.
- Bend test. Bend every strip in the vice along the weld. If it cracks beside the weld rather than in it, fusion is good. If the weld peels off the edge, that is cold lap — add current.
Galvanised sheet, box section and gas welding thin sheet metal
Galvanised. ER70S-6 or flux-cored wire, Ar + CO₂, extraction mandatory. Grind the zinc off both sides of the joint area: in the pool it boils and leaves porosity.
Thin-wall box section welds like thin sheet — seam order on frames is covered in welding box section.
Oxy-acetylene. Filler diameter follows
d = s/2 + 1: 1.5 mm rod for 1 mm sheet, 2 mm for
2 mm. Up to 3 mm you weld leftward (forehand): the flame plays on cold
metal and penetration stays shallow. Details in
gas welding.
Frequently asked questions
MIG or TIG for thin sheet?
TIG below about 1 mm, where separating the heat from the filler is the only way to keep control. MIG from roughly 1 mm upwards, because it is far faster and short arc mode is cold enough. Stick below 1.5 mm takes a practised hand, but with a 2.0 mm electrode and a broken arc it can be done from about 1 mm.
The sheet warps into a wave. What now?
That is shrinkage, and it is prevented rather than cured. Fewer and shorter runs, stitch welding, alternating ends, and clamping to something rigid. Once the panel has waved, straightening means heat again — usually flame straightening, which is its own skill.
Why does it burn through at the end of the seam?
Because the plate is hot by then. The settings that were right on cold metal are too much for metal that has been absorbing heat for two minutes. Either drop the current as you go — a foot pedal on TIG — or work in stitches with cooling time between them.
What wire size and voltage for thin sheet MIG?
0.6–0.8 mm wire in short-circuit transfer. On 0.8–1.0 mm sheet that means 40–70 A and 15–17 V with 8–10 l/min of gas; on 1.5–2 mm, 0.8 mm wire, 70–110 A, 17–19 V and 10–12 l/min. A 1.0 mm wire needs more current than thin sheet can take.
Push or pull the MIG gun on thin metal?
Push, tilted 10–20° from vertical. Pushing gives shallower penetration and a cleaner bead, which is exactly what thin sheet needs. Pulling (dragging) digs the arc in deeper — useful from about 2 mm, usually a hole on 1 mm.
How do I weld thin galvanised sheet?
Grind the zinc off both sides of the joint area, weld with ER70S-6 or flux-cored wire under Ar + CO₂, and always with extraction — zinc fumes are harmful. Zinc left on the joint boils in the pool and leaves porosity along the whole run.
Updated: