Welding vertical up: current, electrode angle and weave
Vertical is where gravity stops helping. The whole technique comes down to keeping the pool small enough that surface tension can hold it in place while it freezes.
Short answer
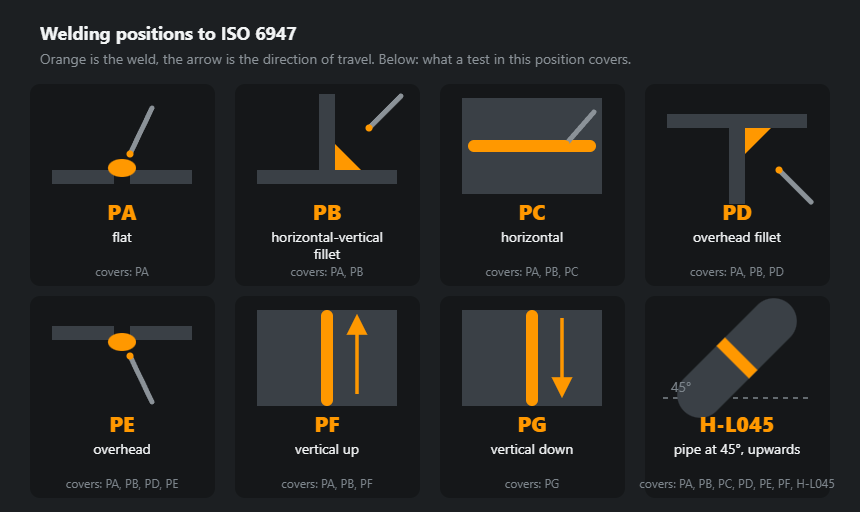
Uphill takes 15 % less current than flat, because the pool has to stay smaller; it gives penetration and suits load-bearing joints. Downhill takes more current than uphill but travels much faster — it suits thin sheet, and on anything thicker it risks lack of penetration.

Two different jobs
Vertical up (PF) is the structural position. Welding upwards, each bead freezes into a shelf that supports the pool above it, so the arc can stay in the joint and penetrate. It is slower and it is what a drawing means when it specifies vertical welding without qualification.
Vertical down (PG) is fast and shallow. The arc runs ahead of the pool, which limits penetration — useful on thin sheet, on cellulosic root runs in pipe, and nowhere that a full-strength joint is required. Codes are explicit about this because the temptation is obvious: down is easier and looks neat.
Settings for vertical up
15 % below the flat-position current, from the current calculator. Electrode no larger than 4 mm in MMA — 5 and 6 mm electrodes produce a pool that no technique will hold. In MIG, short arc mode only: spray transfer has far too much heat and the pool simply leaves.
Basic electrodes are easier than rutile here, which surprises people. The slag from a basic coating freezes faster and does a better job of holding the pool on the wall.
| Thickness | Electrode | Flat, A | Vertical, A |
|---|---|---|---|
| 3 mm | 2.5 mm | 70–100 | 60–85 |
| 4–5 mm | 3.2 mm | 90–140 | 75–120 |
| 6–8 mm | 3.2 mm | 110–140 | 95–120 |
| 10 mm and up | 4.0 mm | 130–190 | 110–160 |
The flat column comes from the current-by-diameter table; the vertical one is the same minus 15 %, the rule this page states.
How to weld vertical up with stick, step by step
The full sequence for a PF weld with a covered electrode, from tacking to filling the crater. The numbers come from the settings table above.
1. Tacks and setting up the start
Fit the joint and tack both ends, plus the middle on a longer seam. Check the gap: too wide and the vertical root falls through, too tight and it will not penetrate. Grind the bottom tack to a taper — a weld that starts on the hump of a tack starts with cold lap instead of fusion. Run a test bead on an offcut of the same thickness clamped upright first; the same current behaves differently on the bench.
2. Starting at the bottom
Strike on the bottom tack or just above the lower edge, hold until the pool has wetted the full width of the groove, and only then start climbing. The first centimetre is where lack of fusion lives: the plate is still cold and the hand is in a hurry. At a rod change, chip the crater, strike a little above it, bring the arc back down into the crater and carry on from there.
3. Electrode angle: travel and work angle
Travel angle — in the plane of the weld. The rod sits almost square to the plate with the tip pointing slightly up, 5–10° off perpendicular (Lincoln Electric gives 5–10°, Miller 0–15°). That way the arc props the pool from below. A steep drag like in the flat position lays the arc along the joint: it heats the metal above the pool instead of holding the pool.
Work angle — across the joint. On a butt the rod is square to the plate and splits the heat evenly between both edges. On a tee the rod bisects the corner, 45° to each plate; if the plates differ in thickness, favour the thicker one slightly. Leaning to one side gives unequal legs and undercut on the plate that gets the extra heat.
4. Arc length
Short: 0.8–1.0 times the electrode diameter, which for 3.2 mm is 2.6–3.2 mm. By ear it is a steady crackle with no pops and no hiss. A long arc shows up at once on a vertical wall: spatter, drips below the pool and undercut at the toes.
5. The shelf and the rhythm of the climb
Each step up lands on the top edge of the metal that has just frozen — that is the shelf the new pool sits on. Watch the upper edge of the pool: it should be a straight, level line. When the edge starts to bulge downwards like a tongue and goes shiny, the pool is overheated — step up now or hold at the edge. Up half a pool, pause at the edges, up again. Keep the rhythm steady; even ripple spacing on the face is the measure of it.
6. Finishing and cleaning
Fill the crater at the end with a short back-step or the down-slope. Chip every run completely; vertical slag clings harder, especially in the grooves at the toes.
Weave patterns in detail: which one where

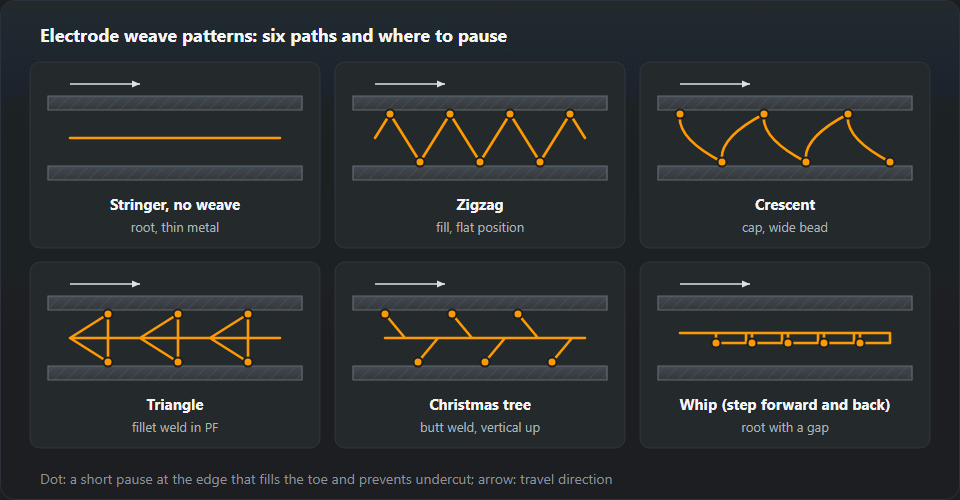
Whatever the pattern, move briskly through the centre and pause at each edge — half a second is enough for the pool to wash out to the toe. The instinct is the reverse, sweeping across the edges and pausing in the middle, and that is what produces undercut down both sides of a vertical weld. Pick the pattern by joint and pass, not by taste:
- Straight stringer — no side-to-side motion, just short lifts. Root passes and thin plate, such as a 2.5 mm rod on 3 mm.
- Zigzag — narrow and even, with a pause at each side. The first fill passes in a narrow groove.
- Crescent, bulging upwards — fillets and cap passes where the metal has to be spread wider.
- Triangle — the tee joint. One point in the root of the corner, two on the plates. A short pause in the corner burns in the root, the pauses on the plates stop undercut.
- Christmas tree — a zigzag with dwells at the extremes, for fill and cap passes in a wider butt groove.
- Step or whip — flick the arc up out of the pool to let it cool, then come back into it. Open roots and thin metal, where the pool wants to burn through.
One thing limits the width of any weave: you must be back at the far edge before it cools. If the cap needs to be wider than that, lay two beads side by side instead of one oversized one.
Worked example: 3.2 mm on 8 mm plate and 2.5 mm on 3 mm
8 mm plate, 3.2 mm electrode. In the table that is the 6–8 mm row: 110–140 A flat, 95–120 A vertical up. The mid-point for 3.2 mm in the general current table is 115 A; 15 % off gives 100 A after rounding to 5 A — the starting point for a rutile rod. For a basic rod the calculator adds 5 % for the coating: 105 A. Arc length 2.6–3.2 mm. A bevelled butt takes several passes: root as a stringer or step, fill with a Christmas tree, cap with a crescent. Adjust in 5 A steps: pool running — down; humped bead — up 5–10 A.
3 mm plate, 2.5 mm electrode. The 3 mm row: 70–100 A flat, 60–85 A vertical, 70 A recommended. Arc length 2.0–2.5 mm. Here the danger is not sagging but burn-through: one pass, stringer or step, no wide weave. If it burns through, go to the bottom of the range and shorten the pauses. Below 3 mm vertical down is often the better choice.
Vertical up with MIG/MAG
Vertical up with a wire feeder means short-circuit transfer: 16–22 V, the wire shorts into the pool 50–200 times a second and the pool stays small and cool, which is why this mode works in every position. Spray transfer (from 26–28 V) sends a stream of fine droplets into a big, fluid pool; it is a flat-position mode, and on a vertical wall the pool runs off. Globular (22–26 V) spatters and is unstable.
In the MIG/MAG settings table the 8–10 mm row reads 26–29 V — that is spray for flat work. Vertical up stays inside short arc, around the 3 mm row: 0.8–1.0 mm wire, 110–150 A, 19–21 V — and thick plate is filled in several passes. Hold the gun nearly square to the plate with a slight push upwards; on a tee, bisect the corner. Weave a triangle or a narrow zigzag with pauses at the sides. The trap of short arc on thick plate is lack of fusion: the face looks fine while the edges never melted. The colder and faster the pass, the higher the risk. Pulsed MIG (one droplet per pulse, low heat input) is the alternative if the machine has it.
PF or PG, and what the WPS says
PF is vertical up, PG is vertical down. They are two separate positions in the standard and on paper. Under EN ISO 9606-1 a test in PF covers PA, PB and PF but not PG: welding downhill needs its own test in PG. It works the other way too — a PG certificate covers only PG. The WPS states position and direction; if it says PF, a weld run downhill is a deviation from the procedure even if it looks good from the outside.
When to use which: PF for load-bearing joints, thicker plate, anywhere penetration counts. PG for thin sheet and cellulosic pipeline roots, where speed counts. The downhill technique is covered on welding vertical down, and the qualification range calculator shows what a test covers.
Root and fill
The root run is usually made without weaving at all: a straight stringer, slow and with a short arc. Weaving belongs to the fill and cap runs, once there is a shelf to build on. Clean the slag between every run — vertical welds trap slag at the toes more readily than flat ones, and trapped slag is an inclusion.
Practising it
Take a 10 mm offcut, clamp it upright, and run beads on the plate surface without any joint. The point is to learn what the pool does when it is about to run — the moment it goes shiny and starts to sag — and to react before it does. That reaction is the whole skill, and it is faster to learn on a plate than on a job.
Drill 1: beads on a vertical plate
6–8 mm plate, 3.2 mm rod, current from the 6–8 mm row (95–120 A). Run beads from the bottom up, each one overlapping half of the last, so you build a pad. It is right when the ripples are the same height, the width does not wander and there are no drips below the bead. Chip after every bead and look at the edges: grooves along the toes mean the pauses are missing.
Drill 2: a tee joint in PF
Two plates tacked into a tee, a fillet run uphill with a triangle weave. Judge it by equal legs, no undercut on the vertical plate and a flat or slightly concave face. Then break the sample through the weld: the fracture shows whether the root of the corner fused, which you cannot see from outside.
Drill 3: a PF butt on a backing strip
Two bevelled plates with a steel backing strip. Root as a stringer or step, fill with a Christmas tree, cap with a crescent. The backing forgives the gap and lets you learn to fill without fear of burning through. Judge it by cutting across and looking at the section: fused into the backing and both bevel faces, no slag between passes. That is close to the layout of a welder qualification test.
What you see and what to change
| Sign | Cause | What to change |
|---|---|---|
| The pool runs down as a drop | Too much current, a long arc, no dwells | Drop the current, shorten the arc, add dwells |
| A humped bead, narrow and proud | Too little current, travelling too slowly | Add 5–10 A and weave wider |
| Undercut along the edges | No dwell at the ends of the weave | Stop at the edge, see undercut |
| Lack of penetration at the root | A thick electrode and a tight gap | A thinner electrode for the root; check the fit-up |
| A crack in the crater | The arc broken off abruptly | Fill the crater, switch on the current down-slope |
Reading a vertical bead
- Sagging, drips below the bead — the pool is too hot. Fix the hand first: shorter arc, pauses at the edges rather than in the middle. Then the current — down 5 A.
- Undercut at the toes — a groove along the edge, the bead seems to hang in the middle. Pauses at the sides too short or the arc too long; check the work angle as well.
- A hump in the middle — a proud bead with unwetted toes. Too cold, or pausing in the centre instead of at the edges: add 5–10 A, weave wider, stop at the edge.
- Lack of penetration — no root bead on the back of a butt, an unfused corner on a tee that shows in a break test. Thinner rod for the root, more gap, a pause in the corner of the triangle.
- Slag between passes — dark inclusions along the edges of the previous bead. A humped bead leaves grooves at the toes that the next pass will not melt out: clean to bright metal, grind the grooves, weave with pauses at the sides.
Order of adjustment: arc length and pauses first, then current in 5 A steps, electrode size last.
Frequently asked questions
Up or down?
Up for anything that has to carry load: the arc runs into metal that is already molten behind it, so penetration is good. Down for thin sheet and cellulosic pipeline root runs, where speed matters and deep penetration would blow through. Choosing down on 10 mm structural steel is a reliable way to produce lack of fusion.
The pool keeps running out of the joint.
Too much heat for the position. Drop the current, shorten the arc, and narrow the weave. If it still runs, the electrode is too large — go down a diameter rather than trying to out-manoeuvre a pool that is too big.
Which weave pattern?
Triangle for a fillet, Christmas tree or a shallow zig-zag for a butt. The pattern matters less than the pause at the edges: whichever shape you use, the time spent at the toes is what prevents undercut.
What amperage for a 3.2 mm (1/8") rod welding vertical up?
On 6–8 mm plate the flat range for 3.2 mm is 110–140 A; vertical up it is 95–120 A, which is 15 % less. Start around 100 A with a rutile rod or 105 A with a basic (low-hydrogen) one, and adjust in 5 A steps by watching the pool.
Can you weld vertical up with MIG?
Yes, in short-circuit transfer only: 16–22 V, which keeps the pool small and cool. Spray transfer (from 26–28 V) makes a large, very fluid pool meant for the flat position — on a vertical wall it simply runs off. Thick plate is filled in several passes.
Does a PF (3G up) certificate cover vertical down (PG)?
No. Under EN ISO 9606-1 a PF test covers PA, PB and PF; PG is covered only by a test welded in PG. Direction of travel in the vertical is a separate position both on the welder certificate and in the WPS.
Updated: