Pipe welding positions: 1G, 2G, 5G and 6G
With pipe, two things decide everything: how it lies and whether it turns. A rotated pipe means welding in one comfortable position; a fixed pipe means walking the circumference through overhead, vertical and flat — all in a single run.
Pipe welding positions chart: 1G, 2G, 5G, 6G and their EN ISO 6947 codes
The American symbols 1G to 6G describe how the pipe is placed; the European ones to EN ISO 6947 describe the position the weld actually sits in. That is why one 5G set-up answers to two European notations: PH (in many WPSs written PF) when you run uphill and PJ (often written PG) when you run down.
| EN ISO 6947 | AWS | Pipe | The weld runs |
|---|---|---|---|
| PA | 1G | rotated, horizontal | flat |
| PC | 2G | fixed, vertical | horizontal |
| PH | 5G | fixed, horizontal | uphill through overhead |
| PJ | 5G | fixed, horizontal | downhill |
| H-L045 | 6G | fixed, at 45° | all of them in turn |
The 5G welding position: what it is and how to weld it
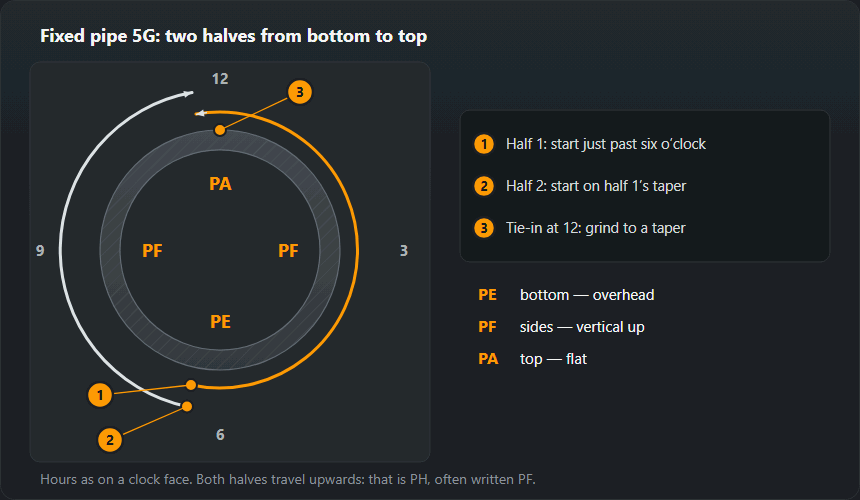
5G is a pipe fixed with its axis horizontal and welded all the way round without turning it. Divide the circumference into quarters in your head and weld uphill on both sides, like two letter Cs. Start a few millimetres before the bottom dead centre so the start of the bead does not land exactly in the root. The position changes as you go: the bottom is overhead, the sides vertical, the top flat — and the current has to be a compromise between all three.
Root on a fixed pipe by the clock: step-by-step sequence
The circumference is read like a clock face: 12 is the top, 6 the bottom, 3 and 9 the sides. In 5G (PH) the weld passes through all of them in one bead, so the technique changes every few centimetres. The sequence below is for a stick-electrode root welded uphill; the fill and cap follow the same path.

1. Tacks away from the start points
Six and twelve o’clock are where the halves start and close, so no tacks go there — they go on the sides. Each tack is ground to a taper at both ends: the root has to melt it, not climb over a hump. Check the gap all the way round before tacking; a pipe that has pulled in on one tack ends up with a gap too wide in one place and too tight opposite.
2. Start the first half just past six
Begin the first half a few millimetres before the lowest point, on the side opposite the one you are going to climb. The start of a bead is always the coldest, worst-fused spot; this way it sits off the very bottom and the second half can close over it. Strike in the groove, hold until the pool wets both edges and goes through the gap, and only then start moving up.
3. The bottom: 5 to 7 is overhead
At the bottom you weld as you would above your head: electrode almost square to the pipe surface, tilted 10–15° in the direction of travel, the shortest arc you can hold. Gravity pulls the root back out of the gap here and leaves root concavity inside (imperfection 515). The cure is to push the arc deeper into the gap instead of dragging it across the surface.
4. The sides: 4 to 2 and 8 to 10 are vertical
On the sides the vertical-up technique applies: the tip points slightly upwards, 5–10° off square, and the pool sits on a shelf of frozen metal. Weave and edge pauses are covered in vertical-up welding. Change the angle smoothly by rolling your wrist with the pipe — a welder who holds one angle from 6 to 12 finishes with the electrode lying along the pipe.
5. The top and the tie-in at twelve
Above 2 and 10 o’clock the weld turns flat: the pool becomes fluid and gravity pushes the root into the bore. Excess penetration (imperfection 504) and burn-through come easily here, so travel faster and shorten the pauses. The first half ends a few millimetres past twelve and its end is ground to a taper. The second half starts on the ground start of the first at the bottom, climbs the other side and closes on the taper at the top — hold the arc on the tie-in until both ends have fused.
Current for 5G and 6G: table and worked example
A fixed pipe has no single position, so the current is a compromise between vertical and overhead: ×0.85 and ×0.8 of the flat value — the same factors used by the current calculator and the welding positions overview. The table below is the general current table multiplied by these factors and rounded to 5 A.
| Thickness, mm | Electrode, mm | PA (rolled), A | PF / PH, A | PE (bottom), A |
|---|---|---|---|---|
| 1–2 | 1.6 | 40–60 | 35–50 | 30–50 |
| 1.5–3 | 2.0 | 50–80 | 45–70 | 40–65 |
| 2–4 | 2.5 | 70–100 | 60–85 | 55–80 |
| 3–5 | 3.0 | 80–130 | 70–110 | 65–105 |
| 3–6 | 3.2 | 90–140 | 75–120 | 70–110 |
| 6–12 | 4.0 | 130–190 | 110–160 | 105–150 |
Example: a 3.2 mm electrode on a 5G pipe. A rolled pipe (PA) takes 90–140 A, middle 115 A. On the fixed pipe the vertical band is 75–120 A (middle 100 A) and the overhead band 70–110 A (middle 90 A). In practice you set the machine near the middle of the vertical band and handle the bottom of the pipe with a shorter arc, because you cannot change the setting halfway round a bead. Arc length for 3.2 mm is 2.6–3.2 mm, for 2.5 mm 2.0–2.5 mm. A 2.5 mm root runs in the lower part of its band: 60–85 A vertical, 55–80 A overhead. Adjust in 5 A steps: concave root at the bottom — more current or a deeper arc; burn-through at the top — less current or faster travel.
Why 6G is the hardest test
The pipe sits at 45° and does not turn, so no position on the circumference ever repeats: every centimetre is a different angle. That is why a qualification passed in 6G covers practically every other set-up, and why the test counts as a welder coming of age.
How to weld 6G (H-L045) in practice
In 6G the pipe is fixed at 45°, and on top of the changing position round the circumference the groove itself is inclined. The pool tends to slide onto the lower bevel: undercut on the upper edge, overlap on the lower one. Three rules follow:
- Same direction as 5G. The root goes in as two halves from bottom to top, with the same tapers at six and twelve. H-L045 is the uphill variant; the downhill one is J-L045.
- Aim the arc slightly at the upper edge. An electrode tilted towards the upper bevel heats it and balances the metal running down. When weaving, the pause on the upper edge is longer than on the lower one.
- Cap in narrow stringers. A wide weave in 6G ends in undercut at the top, so the cap is built as in the horizontal position: several narrow beads from the lower edge upwards, each overlapping the one below. That kind of cap is described in horizontal welding (PC).
In a 6G test the pipe may not be turned and the coupon is usually clamped at a fixed height. Before striking, run the whole circumference dry with the electrode in the holder: if at some point you cannot see the pool or cannot reach, reposition now, not halfway round the root.
The root run and penetration
On pipe you are judged not only on the cap but on the root from the inside, and the inside is usually out of reach. Hence two solutions: TIG for the root with stick or wire for the fill, or a cellulosic electrode run downhill. On stainless add an argon purge, without which the root oxidises and crumbles away.
Preparing the pipe for the root pass
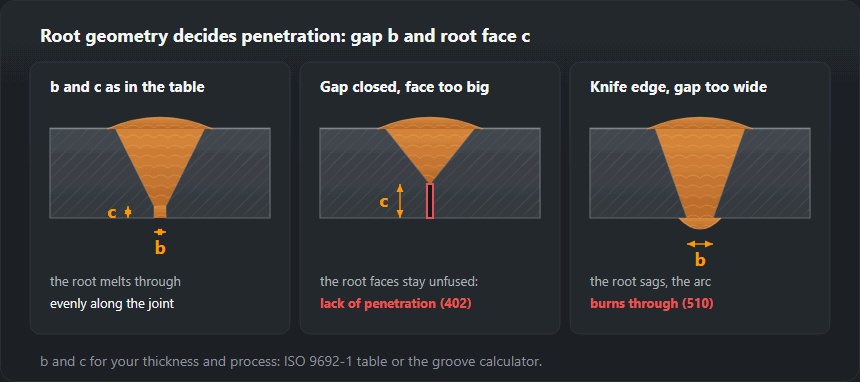
Pipe walls from 3 mm up are usually given a single-V bevel. From the groove table: included angle 50–70°, root face 1–2 mm, gap 1–4 mm; typically 60° for stick electrode and 60–70° for TIG. The exact figures for your wall come from the groove calculator.

- Cleaning. The bevel and a band on each side, outside and inside, to bright metal. Rust and paint inside the pipe go straight into the root.
- Alignment. High-low (misalignment) on pipe leaves a step in the root that no bead will even out. Line the edges up all the way round before the first tack.
- TIG root. For a 3 mm wall the flat-position TIG table gives a 2.0–2.4 mm tungsten, 90–130 A (DCEN), 2.0–2.4 mm filler and 7–9 l/min of argon. In the pipe positions start at the lower end of that band. More on the process in the TIG guide.
- Stick root. Basic electrodes for critical joints; bake them at 300–350 °C for 2 h before use. Cellulosic electrodes are for downhill roots (PJ), covered below.
- Stainless steel. Fill the bore with argon (back purge) before striking and keep it until the root and the first fill pass are done — details in welding stainless steel.
PH or PJ: uphill or downhill round the pipe
Both directions are the same 5G set-up but different positions on paper. PH (often written PF in a WPS) is welding uphill: slower, deeper penetration, the standard for structures and pressure piping. PJ (often written PG) is welding downhill, from twelve to six: fast, with cellulosic electrodes, typical of pipeline root runs. Downhill technique is covered in welding downhill. Direction is not a matter of taste: a PF qualification does not cover PG, and H-L045 does not cover J-L045.
Pipe test or plate test
Under EN ISO 9606-1 a pipe test over 25 mm diameter also covers plate. A plate test reaches pipe only from 500 mm diameter, or from 75 mm if the pipe is rotated, so for small-bore work fixed in place the test has to be on pipe. Positions and the diameter range a pipe test gives are set out below; the exact range also depends on thickness, joint type and whether the root was welded without a backing.
What a pipe test actually covers
The test position decides which positions the welder is qualified for. From the EN ISO 9606-1 coverage table (the conservative reading, the same as in the calculator):
- H-L045 (6G uphill) covers PA, PB, PC, PD, PE, PF, PH, H-L045 — the widest range from a single coupon.
- J-L045 (6G downhill) covers PA, PC, PE, PG, J-L045, so nothing uphill.
- PF / PH (5G uphill) covers PA, PB, PF; it does not cover PC, so a vertical pipe (2G) needs a separate test or 6G.
- PC (2G) covers PA, PB, PC.
The second variable is the diameter. Up to 25 mm the range is D to 2·D; above that it is from 0.5·D but not below 25 mm, with no upper limit:
| Test piece diameter D, mm | Qualified range |
|---|---|
| 21.3 | 21.3…42.6 mm |
| 25.0 | 25.0…50.0 mm |
| 33.7 | ≥ 25.0 mm |
| 48.3 | ≥ 25.0 mm |
| 60.3 | ≥ 30.2 mm |
| 88.9 | ≥ 44.5 mm |
| 114.3 | ≥ 57.2 mm |
| 168.3 | ≥ 84.2 mm |
| 219.1 | ≥ 109.6 mm |
Example. A 6G test on 60.3 mm pipe with a 5 mm wall: diameters ≥ 30.2 mm, positions PA, PB, PC, PD, PE, PF, PH, H-L045, thickness 3 mm to 10 mm (rule for 3 ≤ t < 12: 3 mm to 2·t). The same test on 21.3 mm tube would give only 21.3…42.6 mm — which is why you do not test on small tube if the job is on large pipe. The full range with process and joint type comes from the qualification range calculator, and the test itself is described in welder qualification.
The root of the coupon is judged from the inside. Under ISO 5817, root concavity (515) on a 5 mm wall is limited to 0.25 mm at level B, 0.5 mm at C and 1 mm at D. It is the imperfection to watch at the bottom of a 5G pipe, where gravity pulls the root out of the gap.
How to practise: from 1G to 6G
- 1G — rolled pipe. Root and cap in the flat position, the pipe turned by hand or on a turning roll every few centimetres. Goal: even penetration all the way round without changing technique.
- 2G — vertical pipe. A circumferential weld in the horizontal position: narrow beads from the bottom up. It teaches a cap that does not sag.
- 5G without a root. Stringer beads on a fixed pipe from six to twelve on both sides. Only wrist angle and body position — no worrying about penetration.
- 5G with a root. A full joint, then cut the coupon into quarters: check root concavity at the bottom, excess penetration at the top, sidewall fusion on the sides.
- 6G. Only once 5G is repeatable. Root alone first, then the cap in narrow stringers.
Faults by the clock
- Six: concave root, slag at the start. Long arc or no hold at the start. Shorten the arc, drive it into the gap, grind the start.
- Three and nine: undercut at the edges. No pauses at the toes, as in vertical-up. Pause at each end of the weave.
- Twelve: excess penetration, burn-through. Too slow or too hot in the flat zone. Travel faster, shorter pauses.
- Tie-ins: lack of fusion and incomplete penetration. The end of the previous half was not ground. Taper it and hold the arc on the tie-in.
Frequently asked questions
What is the difference between 5G and 6G?
In 5G the pipe lies horizontal and does not turn; in 6G it sits at 45° and does not turn either. In 6G no position on the circumference ever repeats, so it is harder and it covers a wider qualification range.
Does a pipe qualification cover plate?
Yes, if the pipe was over 25 mm in diameter. The reverse is limited: under EN ISO 9606-1 a plate test covers pipe only from 500 mm diameter, or from 75 mm when the pipe is rotated.
Where do you start the bead in the 5G position?
A few millimetres before bottom dead centre, so that the start of the bead — the weakest spot — does not land exactly in the root.
What does the H-L045 welding position mean?
A fixed pipe inclined at 45° and welded uphill (the American 6G). On the EN ISO 9606-1 coverage table it covers PA, PB, PC, PD, PE, PF, PH, H-L045. The downhill counterpart is J-L045, which covers only PA, PC, PE, PG, J-L045.
Is PH the same as PF?
The direction is the same — upwards — but PH means a fixed pipe with a horizontal axis and PF a vertical joint on plate. Many WPSs and certificates write PF for pipe too; then the direction matters, not the letter.
What current for a 3.2 mm electrode in the 5G position?
On a fixed pipe the current is a compromise between vertical (75–120 A) and overhead (70–110 A). Set about 100 A and shorten the arc at the bottom of the pipe. A rolled pipe (PA) takes 90–140 A.
What diameter range does a test on 60.3 mm pipe give?
Under the EN ISO 9606-1 rule, above 25 mm the range starts at 0.5·D but not below 25 mm: for 60.3 mm that is ≥ 30.2 mm with no upper limit. A 21.3 mm tube would give only 21.3…42.6 mm.
Updated: