MMA welding: how stick welding actually works
Process 111 in the EN ISO 4063 numbering, SMAW in the American one, and "stick" everywhere else. The oldest arc process still in daily use, and on site still often the best one.

What it is called
| What it is called | Name |
|---|---|
| In the standard (ISO 4063) | 111 — Manual metal arc welding with covered electrode |
| Process number | 111 |
| International abbreviation | MMA · SMAW |
| On the shop floor | MMA — stick welding |
Three names for one thing. The welding procedure specification and the welder’s certificate carry the standard name with its number; the job advert and the shop floor use the abbreviation; an American drawing uses its own. All three are worth knowing: it is the same work, and it looks different on every piece of paper.
What happens at the arc
An arc burns between the metal core of the electrode and the workpiece at several thousand degrees — far hotter than the melting point of steel. The core melts and crosses the arc as droplets. The coating melts too, and it is the coating that does the clever work: it releases gas that displaces air from the arc, it forms slag that floats on the pool and protects it while it cools, it stabilises the arc electrically, and it carries alloying elements into the weld.
That is why a stick electrode is not simply wire with a covering. Change the coating and you change the process: its penetration, its hydrogen level, the positions it can work in and the current it wants.
The coating decides everything
Rutile electrodes strike easily, run on AC or DC, give a smooth bead and slag that peels off almost by itself. They are the ones to learn on and the ones for general fabrication. Their weakness is hydrogen: they carry more of it than basic types.
Basic electrodes give tough, low-hydrogen weld metal and are what structural and pressure work calls for. They also strike badly, need DC+, run a stiffer arc and must be kept dry. Every welder who has cursed at an electrode that would not light was probably holding a damp basic one.
Cellulosic electrodes make a deeply penetrating, violent arc that can be run downhill at speed. They are the pipeline root-run electrode and almost nothing else.
The differences are set out in full in electrode coating types.
Setting up
Current comes from the diameter — 30 to 40 A per millimetre, less for vertical and overhead. The current calculator applies the corrections, and the table gives the same figures for the wall.
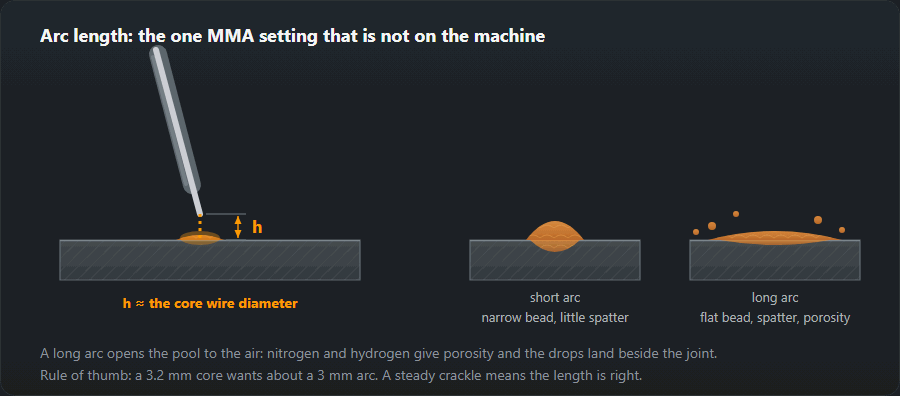
Arc length is the parameter nobody sets on the machine and everybody controls with their hand: keep it roughly equal to the core diameter. Too long and the arc pulls air in, giving porosity and spatter; too short and the electrode freezes into the joint.
The rod is dragged, 10–15° from vertical, so the arc force pushes the slag behind the pool instead of over it; the angles are set out in step 3 below.
| Thickness, mm | Electrode, mm | Current, A | Passes |
|---|---|---|---|
| 1.5–2 | 2.0 | 50–80 | 1, breaking the arc |
| 3–4 | 2.5–3.2 | 80–120 | 1 |
| 5–6 | 3.2 | 100–140 | 1–2 |
| 8–10 | 4.0 | 140–180 | 2–3, with a prepared groove |
| 12+ | 4.0–5.0 | 160–250 | 3 or more, a prepared groove is a must |
When MMA is still the right choice
Outdoors and in wind, because there is no gas shield to blow away. On rusty, painted or galvanised steel, where a basic electrode will still make a sound weld. On site, where the equipment is one box and two leads and nothing needs a trolley. On repairs, where the exact grade of the parent metal is unknown and a forgiving process matters more than deposition rate.
Where it loses is productivity: arc-on time is 25 to 35 % because of electrode changes and slag removal, against 40 to 55 % for MIG/MAG. In a shop with repeat work that difference decides the process, and the cost per metre makes it visible.
| Strengths | Weaknesses |
|---|---|
| No gas and no wire feeder needed | Low output: you stop to change the electrode |
| Works in wind, on site and at height | Slag must be chipped off between passes |
| Tolerates rust, mill scale and paint on the edges | Metal thinner than 1.5 mm is hard going |
| A huge choice of electrodes for any metal | Electrodes fear damp: baking and dry storage |
| Every position, overhead included | More spatter and more cleaning up than TIG |
MMA welding technique, step by step
Before you strike: polarity as the packet says (basic on DC+ only, rutile on AC or either DC polarity, cellulosic on DC+ or AC), current from the middle of the range for the diameter, the return clamp close to the joint on clean metal, and the edges ground bright on both sides.
1. Striking the arc: scratch or tap
The scratch start, like striking a match, is the forgiving one and the one every beginner learns first: drag the tip across the metal in a short stroke and, as the arc lights, lift it to working length. The tap start — touch and lift straight away — is for tight corners and for work where no stray marks are allowed beside the weld. Always strike in the groove or on the stretch you are about to weld over: an arc strike on clean plate next to the joint is a hardened spot and a ready-made crack starter.
Strike a basic electrode a little ahead of the start and come straight back to the beginning of the joint: its first droplets are poorly shielded, and on the stretch you travel back over they get remelted. If the rod freezes to the work, do not yank it straight back — twist the holder sideways or open the jaws. Causes and the order to check them are in why the electrode sticks.
2. Holding the arc length
The current calculator gives the arc length as 0.8–1.0 times the core diameter: 2.6–3.2 mm for a 3.2 mm rod, 3.2–4.0 mm for a 4.0 mm one. The hard part is that the electrode burns away along its whole length, so your hand has to keep feeding down at the rate it melts — that, not travelling along the joint, is the real skill of stick welding. You can hear a correct arc: a steady, dense crackle like bacon in a pan. A long arc hisses, throws spatter and spreads a wide, flat bead; a short one chokes and sticks. Run basic electrodes shorter than rutile, at the bottom of that range.
3. Electrode angles: travel and work
Travel angle, in the plane of the weld: 10–15° from vertical, top of the rod leaning the way you are going, tip pointing back at the finished weld — you drag it. Stand the rod upright or push it the other way and the slag runs ahead of the pool, the arc covers it with metal and an inclusion is born.
Work angle, across the joint: square to the plate, 90°, on a butt weld. On a T-joint 45° to both plates, and in PB a touch higher, towards the upright plate, because gravity pulls the pool down — the details are in the PB fillet weld guide. With plates of different thickness aim more at the thicker one: the thin one heats faster and that is where the undercut appears.
4. Travel speed: read the width and the ripples
No dial shows travel speed; the bead does. Watch the pool, not the arc: at the right speed the pool stays the same size and the bead keeps one width from end to end. The ripples tell you the rest:
- even, gently curved half-moons, a flat face that wets into both toes — about right;
- ripples pulled into sharp V shapes, a narrow, humped bead, undercut at the toes — too fast;
- round ripples, a wide, tall bead, metal rolling over the toes and slag running ahead of the pool — too slow.
Weave patterns and where to pause

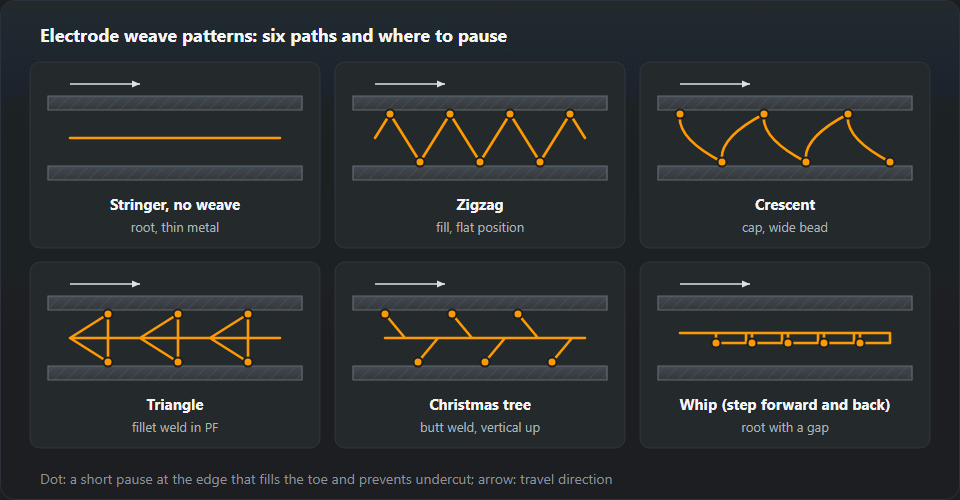
A straight stringer with no weave goes into the root, onto thin material and overhead. Weaving widens the bead and buys time to melt the edges in — it belongs in the fill and cap runs of thicker joints.
- Zigzag — the simplest, for cap runs on flat butt welds.
- Crescent — the path bows back towards the finished weld; it fills the toes better and makes a good cap.
- Triangle — for vertical fillets: the point goes into the corner, where you want more time and more penetration.
- Christmas tree — for vertical-up butt welds, left and right alternately while climbing.
- Step or whip — the arc flicks ahead of the pool for a moment and comes back; the pool freezes a little in between and does not run. For roots with a gap and for vertical work.
One rule for every pattern: quick through the middle, a fraction of a second at each edge. Doing it the other way round — dwelling in the middle and sweeping past the edges — gives a humped bead with undercut. Weave no wider than it takes to cover the groove: at the ends of a wide swing the arc stretches and pulls air in.
Breaking the arc, restarting and filling the crater
An electrode always runs out halfway along a weld, so stops and restarts have to be made so the tie-in does not show. Just before the rod is spent, pause for a moment to fill the pool and take the arc off with a quick flick sideways and back onto the finished weld.
A restart in four moves: chip the slag off the crater and the last stretch of weld; strike on the weld just ahead of the crater, not on clean plate beside it; bring the arc back into the crater and hold it there until the pool fills it to bead height; only then move on. Starting right in the crater with a cold rod leaves a hole or a lack of fusion at the tie-in; starting too far ahead leaves a hump.
The crater at the end of a weld is filled the same way: stop, or run back briefly over the bead until the crater is full, and only then lift off to the side. An unfilled crater is a hollow full of shrinkage stress — it is the "crack in the crater" row in the table below. On critical joints the end is run out onto a run-off tab.
Slag between runs and multi-pass welds
Chip the slag after every run, no exceptions — hammer, then wire brush, paying attention to the toes, where it hides. A sharp groove between a bead and the side wall of the preparation is a slag trap: round it off with a grinder before the next run, along with humps and convex beads. The settings table above gives the number of runs: 2–3 with a prepared groove at 8–10 mm, three or more from 12 mm.
The order: the root as a straight stringer, short arc, smaller electrode; then fill runs — weaved, or as several beads side by side, each overlapping the last by about a third; the cap last. Stagger the restarts from layer to layer so the tie-ins do not stack on top of each other. Every layer should come out flat or slightly concave: the next run will not fuse into the sides of a convex one.
The four mistakes that show up in every weld test
Examiners see the same four faults again and again: current too low, an arc held too long, the wrong electrode angle and damp electrodes — the last one also behind cold cracks that appear a day later on restrained joints in higher-strength steel. The table pairs what you see with its cause; the next section says what to change.
| What you see | Cause |
|---|---|
| Pores all along the weld | Damp electrode, dirty edge, too long an arc |
| Undercut along the weld | Current too high, travelling too fast, wrong angle |
| Lack of penetration at the root | Current too low, gap too tight, electrode too thick |
| Slag trapped in the weld | The previous pass was not cleaned, the arc runs ahead of the slag |
| A crack in the crater | The arc was broken abruptly and the crater left unfilled |
Reading the bead: what to change
- A narrow, tall bead sitting on the plate with dry toes — too little current or too much speed. Add 10–15 A or slow down; an electrode too thick for thin material looks the same.
- Undercut, a groove along the toe — current too high, arc too long, no pause at the edge of the weave, or the wrong work angle (in PB, on the upright plate). Take off 10–20 A, shorten the arc, pause at the edges.
- Slag inclusions, dark lines at the toes after grinding or in a break test — the previous run not cleaned, a sharp groove at the toe, the rod pushed instead of dragged, or travel so slow that slag runs ahead of the pool.
- Pores in the first few centimetres with a basic electrode — start porosity: the arc was struck right at the start and held long. Strike ahead and come back, and hold a short arc from the first second. Pores all along the weld point to damp rods or dirt instead.
- Sticking on the strike or mid-run — current low, arc too short, a damp coating or a poor return connection.
Most of these signs show earlier, in the pool itself: how to read its shape, size and the way the slag behaves is covered on the weld pool page.
Practice exercises for beginners
- Stringer beads on 6–8 mm plate. Plate flat, 3.2 mm rutile rod, current from the middle of the range — around 115 A. Lay straight beads side by side, chipping and judging each before the next. You have it when the width is the same from start to finish, the ripples are even, the slag peels by itself and the starts and ends have no holes.
- Padding in layers. On the same plate, beads side by side with a one-third overlap until the plate is covered, then a second layer across the first. It teaches overlap, cleaning and restarts; a good layer is flat, with no valleys between beads and no black slag lines once ground.
- T-joint in PB. Two strips of the same thickness tacked at a right angle: one run first, then three (corner, bottom, top). Check: equal legs on the gauge, no sag on the bottom plate and no undercut on the upright one. For a break test, hammer the upright over until the weld fails — the root of the corner should be fused along its whole length.
- Vertical up, PF. Only once PB comes out consistently. Current 15 % below flat, short arc, triangle or step weave — the whole route is in the guide to welding vertical up.
Worked example: current for a 3.2 mm rod on an 8 mm T-joint
The job: a T-joint in 8 mm plate, position PB, 3.2 mm rutile rods, because that is all there is in the box.
- Current-by-diameter table: 90–140 A for 3.2 mm, middle 115 A, material 3–6 mm. 8 mm is outside that band, and the settings table above suggests a 4.0 mm electrode at 140–180 A for 8–10 mm. Conclusion: a 3.2 will do it, but in the upper half of its range and in several runs.
- Position correction: PB takes a factor of 0.95. 90–140 A × 0.95 = 85–135 A, middle 115 × 0.95 ≈ 110 A (rounded to 5 A, as the calculator does).
- Starting point: 110–115 A on an offcut of the same plate. A T-joint draws heat away three ways, so on 8 mm you are more likely to add than subtract: a narrow bead that does not wet the plates means +10 A, up to 125–135 A. Undercut on the upright plate means 10 A back down.
- Basic electrode: the calculator adds 5 % for it: 115 × 0.95 × 1.05 ≈ 115 A, range 90–140 A — the two corrections practically cancel out.
- Runs: the first into the corner; if the drawing calls for a bigger fillet than one bead gives, two more, bottom and top, each overlapping by a third and each after chipping.
- The same T-joint vertical up, PF: 115 × 0.85 ≈ 100 A, range 75–120 A.
Frequently asked questions
Which polarity for stick welding?
Basic electrodes run on DC+ (electrode positive) only; rutile runs on AC or on either DC polarity; cellulosic on DC+ or AC. With coated electrodes DC+ gives somewhat deeper penetration, while DC− melts the electrode off faster with shallower penetration, which helps on thin sheet — Lincoln Electric and Miller both describe it this way. If the packet names a polarity, follow the packet: the coating was formulated for it.
What angle should I hold the electrode at?
Along the joint, 10–15° from vertical with the top leaning in the direction of travel — a drag angle, so the slag stays behind the pool. Across the joint, 90° to the plate on a butt weld and 45° to both plates on a T-joint, tipped slightly towards the upright plate in PB.
How many amps for a 3.2 mm rod on 8 mm plate?
The full range of a 3.2 mm electrode is 90–140 A, and on 8 mm you work in its upper half. On a T-joint in PB the 0.95 position factor gives 85–135 A, starting at 110–115 A. For 8–10 mm the better tool is a 4.0 mm electrode at 140–180 A in 2–3 runs.
How do I restart a weld without a hole or a lump?
Chip the slag off the crater, strike on the weld just ahead of the crater, bring the arc back into it and hold until it fills, then carry on. Starting in a cold crater leaves a hole; starting too far ahead leaves a hump.
Why does the arc keep going out on a long lead?
Because the voltage is being lost in the cable rather than at the arc. Check the cable cross-section, the return clamp and the joints. This is far more common than a faulty machine.
Do basic electrodes really need baking?
Yes, if the joint matters. A basic coating absorbs moisture from the air, moisture becomes hydrogen in the arc, and hydrogen causes cold cracking a day after the weld looked fine. Typical re-bake is two hours at 300–350 °C, then a quiver at 100–150 °C. Rutile electrodes do not need it.
Updated: